Table of Contents
Appendix C: Online Application Module
C.1 Registration-Getting Started
C.5.1 New Application – Plot Details – Step 1
C.5.2 New Application – Verify Firm Details– Step 2
C.5.3 New Application – Verify Promoter Details – Step 3
C.5.3.2 Additional Promoter(s)
C.5.4 New Application – Enter Project Details – Step 4
C.5.4.4 Material and Manufacturing Process
C.5.5 New Application – Enter Land Details – Step 5
C.5.6 New Application – DD Payment Details – Step 6
C.5.7 New Application – Finish – Step 7
C.6 View Submitted Application
Appendix A: Executive Overview
APIIC is the premier organization of Andhra Pradesh that provides industrial infrastructure through development of industrial areas across the districts of Andhra Pradesh.
The APIIC ensures each Industrial park /industrial development park industrial area is surveyed, measured and site plans of plots/sheds/shops/godowns are prepared, boundaries fixed; and all the necessary details like dimensions, extent of plot /area, survey no. etc. are made available in the zonal and concerned sub- zonal offices and published on the APIIC website, for information of the entrepreneurs.
Any newly developed industrial area is officially notified to the public through newspapers and published on the APIIC website, inviting Applications from the entrepreneurs for allotment.
In case of existing industrial areas, the area-wise vacancy positions for the plots/sheds/shops/godowns, available for allotment are displayed on the Notice boards of the Zonal and sub-zonal offices and published on the APIIC website.
The entrepreneurs seeking plots/sheds/shops/godowns for allotment; to set- up their industries/Businesses or common use facility for industries, can file their online Applications on the APIIC website (http://www.apiic.in/)
The ‘Online Application’ module facilitates the entrepreneurs to submit their application for allotment in the preferred industrial area of any district, expediting the process of submission against the conventional process of submitting the physical Application in the concerned Zonal /Sub-Zonal offices.
Online Application system has many advantages over physical Application submission; a few of them are listed as under:
- It can be submitted quickly and easily
- The system checks for any errors in the Application and pops alert messages
- The system has series of security procedures to prevent any un-intended user to access the details.
- It can be saved for future use
- It can be updated for details any time before the closing date
- It can be submitted any time -24 hours a day, 7 days a week, before the closing date.
- As the application is submitted directly to APIIC , the risk of missing the deadline is minimized
- It saves time with capability to apply for multiple plot allotments at one time
- It facilitates real-time tracking of the Application status
- It Eliminates the risk of losing the application while processing
- Facilitates notifications in the form on emails/SMS on submission of Application and at various levels of processing
Once the online Application is submitted, the physical application in the prescribed format needs to be submitted within 2 days of filing the online Application.
All the Applications submitted at the Zonal /Sub-Zonal/ Head office levels are presented for evaluation in the Committee meetings held at the District & Head office level or state level, depending upon the extent of plot or cost of land. The decision of the committee on the Application is communicated to the Applicant via email/SMS.
The purpose of this document is to serve as a user guide for the Online Application module developed by Kensium for the APIIC website; and present an overview of the online Application system explaining the concepts and functionality of the same.
Appendix B: Users
B.1 Users
The following are the user types and their roles in the Online Application module:
|
User |
Role |
|
Users |
|
Appendix C: Online Application Module
This section provides a high level understanding of the functionality of the Online Application module with the help of appropriate screenshot from the APIIC website.
C.1 Registration-Getting Started
- To access the Online Application module, log-on to the APIIC website http://www.apiic.in/
- Click on the ‘ apply’ tab on the Home page of the APIIC website. it will show the accordion menu

Screen #1: APIIC website Home page
- click on ‘ Online Land Allotment Application ’ from the menu as it shown in above screen, user is redirected to ‘Sign in ‘screen of Online Application module, in a new window, as indicated in the screenshot below:
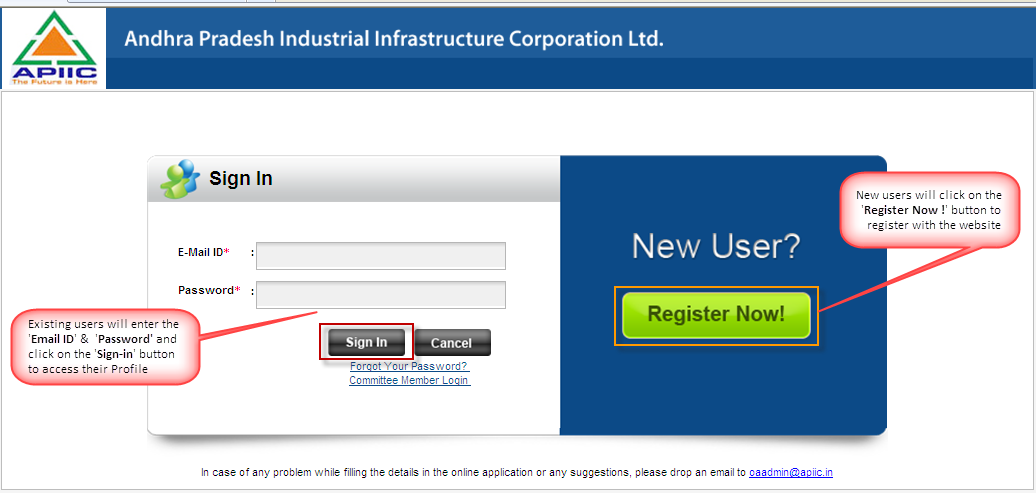
Screen #2: Online Application- Sign in screen
- The ‘Sign-in ‘ screen will display login section and registration section
- Existing users will enter their email ID and password and click on the ‘Sign in’ button to access their profile page
- As registration is a prerequisite to access the Online Application module, new user needs to register to the website by clicking on the ‘Register Now!’ button
C.2 New User Registration
- On clicking the ‘Register Now!’ button , system will display the registration form to be filled-in by the user, as indicated in the screenshot below:
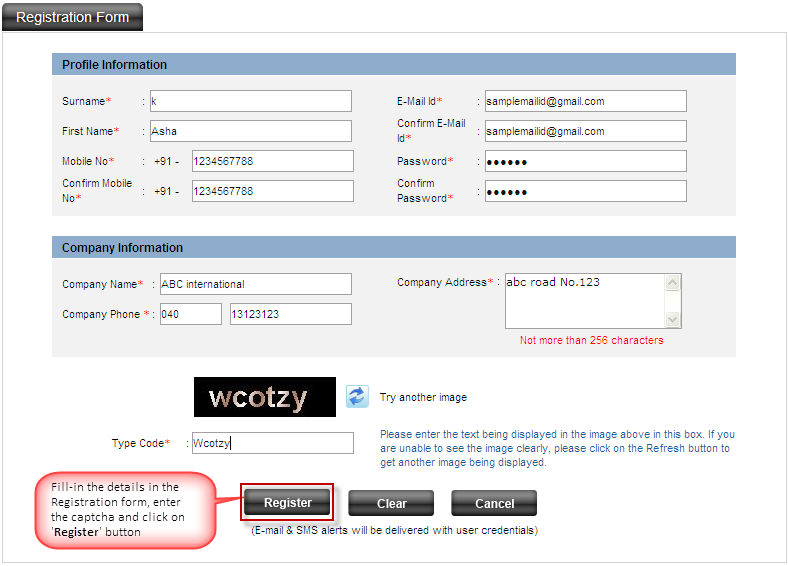
Screen #3: Registration Form
- The registration form is divided into the following 2 sections :
- Profile Information
- Company information
- User needs to enter the following details under ‘Profile Information’ section:
- Surname – Enter surname
- First Name – Enter First name
- Mobile No.- Enter 10 digit mobile number on which you wish to receive SMS alerts
- Confirm Mobile No. – Re-enter the mobile number for confirmation
- Email ID – Enter the email ID on which you which you wish to receive email notifications
- Confirm Email ID – Re-enter the email ID for confirmation
- Password – Enter the password you choose to log-in to your account on APIIC website
- Confirm Password- Re-enter the password for confirmation
Note 1: All the fields are mandatory to enter.
- User needs to enter the following details under ‘Company Information’ section:
- Company Name - Enter the registered company name
- Company Phone – Enter the company landline phone number
- Company Address – Enter the contact address of the company
Note 2: All the fields are mandatory to enter.
- After all the above mentioned details are filled-in, enter the CAPTCH code displayed in the images.
- Click on ‘Clear’ button to clear and re-enter the details.
- Click on the ‘Cancel’ button to navigate back to the ‘Sign in ‘ screen
C.3 My Home
- On successful registration, the system redirects the user to the ‘Home page’ of the users account , as indicated in the screenshot below :
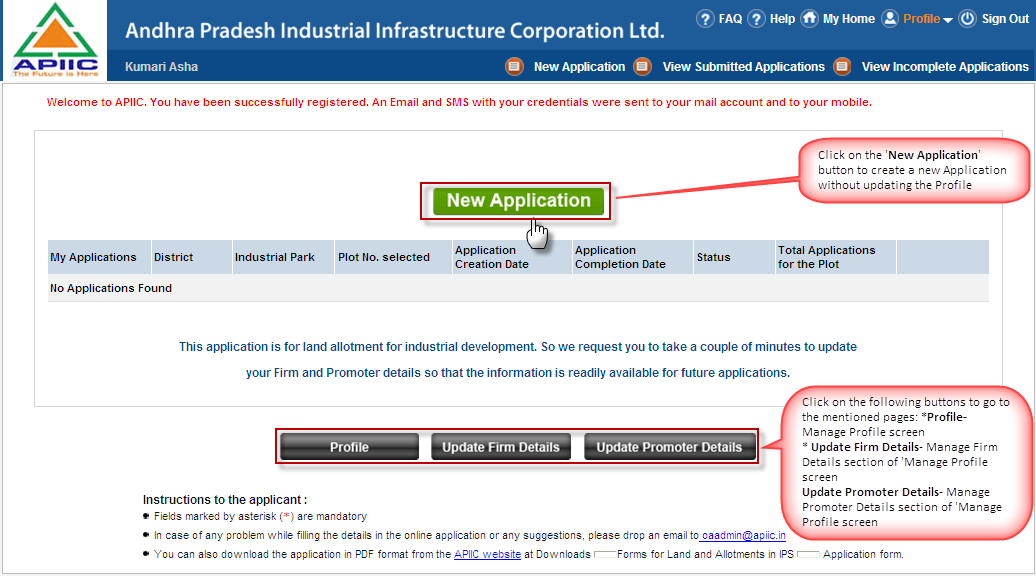
Screen #4: Home Screen of registers user
- The system displays the successful registration and welcome message on the top of screen
- The home page display the summary of Applications generate by the user along with the status
- Click on the ‘New Application’ button to generate a new application for allotment
- Click on the ‘Profile’ button to go to the ‘Manage Profile’ screen
- Click on the ‘Update Firm Details’ button to go to the ‘Manage Firm Details’ section in the Manage Profile screen
- Click on the ‘Update Promoter Details’ button to go to the ‘Manage Promoter Details’ section in the Manage Profile screen
C.4 Profile
On clicking the ‘Profile’ button the user is redirected to the ‘Manage Profile’ screen, as indicated in the screenshot below:
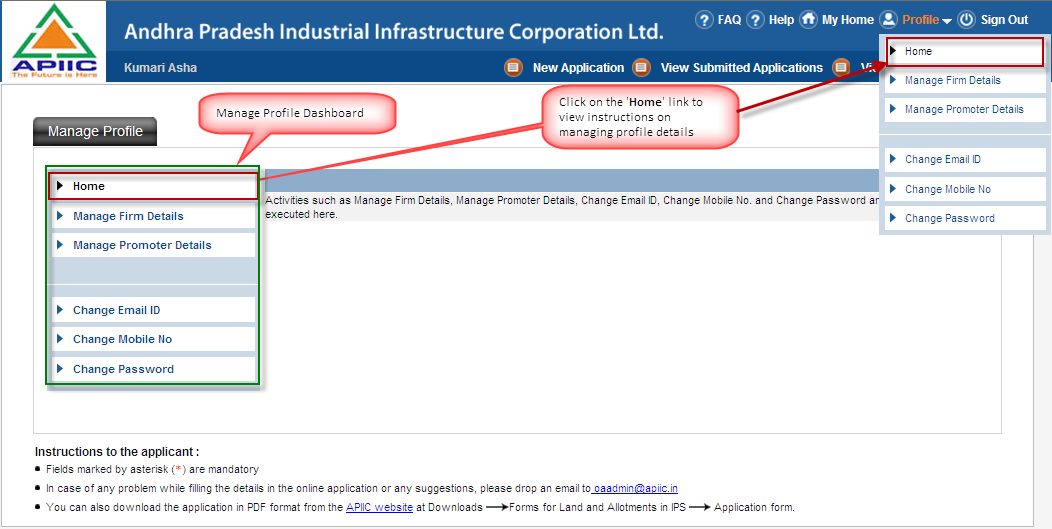
Screen #5: Manage Profile Screen
- The ‘Manage Profile’ screen displays the dashboard with the following links:
- Home
- Manage Firm details
- Manage Promoter details
- Change Email ID
- Change Mobile No.
- Change Password
- By default the ‘Home’ link is selected and it displays the purpose of the profile dashboard.
- User can also navigate to the ‘Home’ page of the manage profile screen by clicking on the ‘Home’ option under the ‘Profile’ link at the top right of the website
C.4.1 Manage Firm Details
- Click on the ‘Manage Firm details ‘ link on the dashboard ,the system displays a form to update the firm details
- User can also navigate to the ‘Manage Firm Details’ page of the manage profile screen by clicking on the ‘Manage Firm Details’ option under the ‘Profile’ link at the top right of the website , as indicated in the screenshot below:
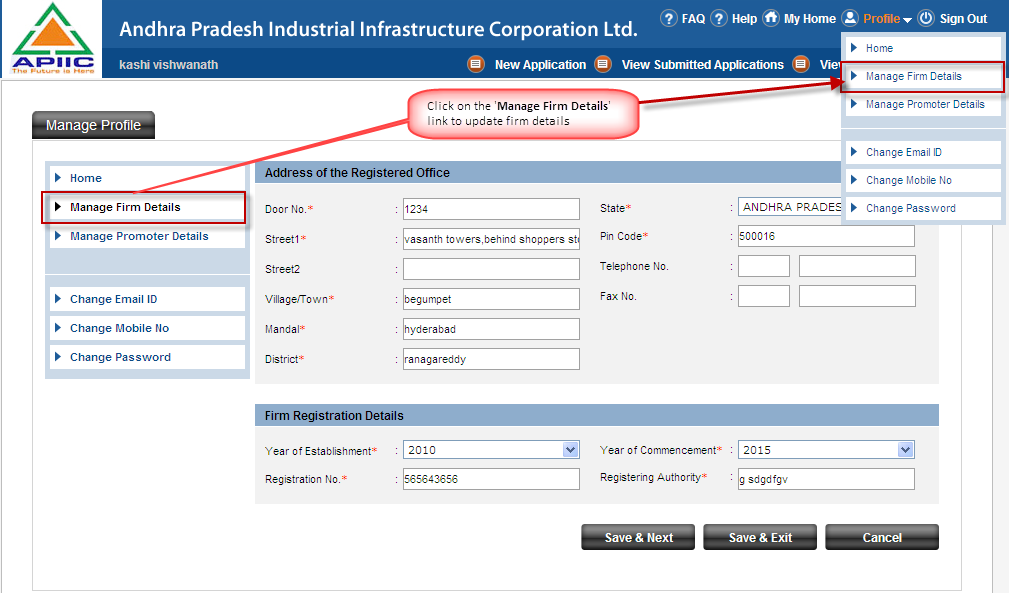
Screen #6: Manage Firm Details
- The ‘Manage Firm Details’ form is divided into the following 2 sections:
- Address of the Registered office
- Firm Registration details
- The user needs to enter the following details of the registered company office under the ‘Address of the Registered Office’ section:
- Door No.- Enter the door number
- Street 1 - Enter the additional address details
- Street 2 - Enter the additional address details
- Village /Town - Enter the village / Town name in which it is located
- Mandal - Enter the Mandal name under which it falls
- District - Enter the District name under which it falls
- State – Enter the name of the state
- Pin Code- Enter the pin code
- Telephone No.- Enter the 8 digit official landline number along with STD code
- Fax No.- Enter the fax number
Note 3: Only Street 2, Telephone No. and Fax No. fields in the section is optional to enter.
- The user needs to enter the following registration details for the company ‘Firm Registration Details’ section:
- Year of Establishment – Enter the year when the company is established
- Registration No. – Enter the registration number of the company
- Year of commencement – Enter the year when the company commenced its operation
- Registering Authority – Enter the name of the authority with which the company is registered
Note 4: The Year of commencement should be greater than Year of Establishment. All the fields are mandatory to enter in this secction
- After all the above mentioned details are filled-in, click on the ‘Save & Next’ button to save the entered details and to proceed to the next step of updating the promoter details
- Click on the ‘Save & Exit’ button to save the entered details and go back to home link of the dashboard
- Click on the ‘Cancel’ button to quit updating the firm details and go back to the home link of dashboard
Note 5: System will display a confirmation message for quitting the update process on clicking the ‘Cancel’ button
C.4.2 Manage Promoter Details
- Click on ‘Save & Next’ button on the firm details page or click on the ‘Manage Promoter Details’ link on the dashboard, the system displays the form to update the promoter details
- User can also navigate to the ‘Manage Promoter Details’ page of the manage profile screen by clicking on the ‘Manage Promoter Details’ option under the ‘Profile’ link at the top right of the website , as indicated in the screenshot below:
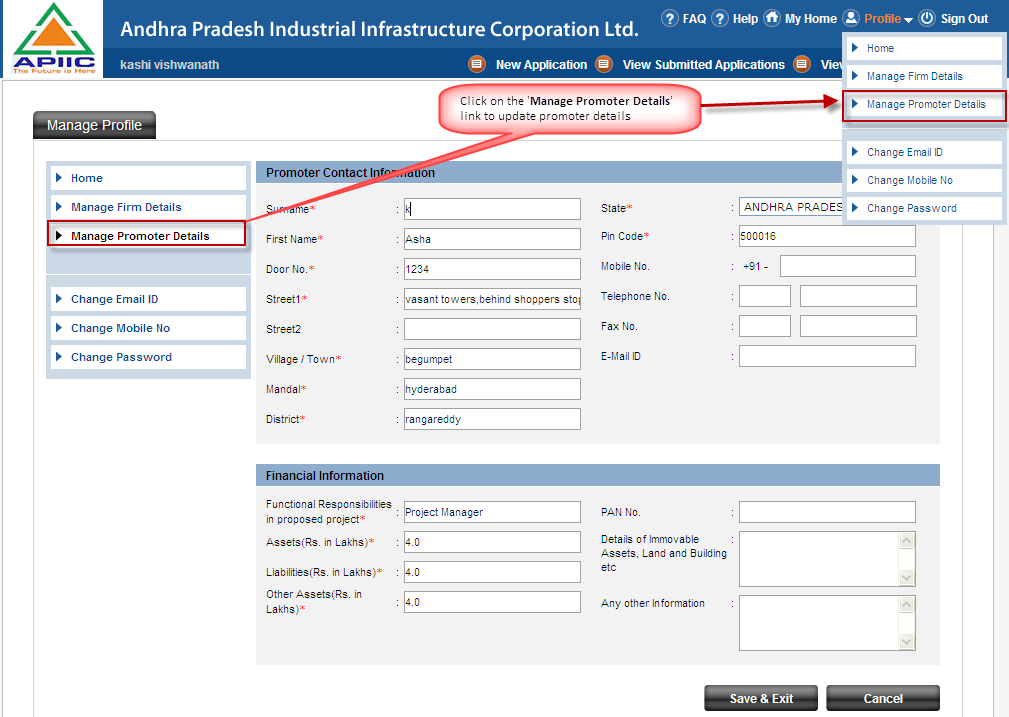
Screen #7: Manage Promoter Details
- The form is divided into the following 2 sections:
- Promoter Contact Information
- Financial information
- The user needs to enter the following details of the promoter of the company which can be an individual or a company; under the ‘Promoter Contact Information’ section:
- Surname: Enter surname
- First Name: Enter first name
- Door No.- Enter the door number
- Street 1 - Enter the address details
- Street 2 - Enter the additional address details
- Village /Town - Enter the village / Town name in which the promoting individual/company is based
- Mandal - Enter the Mandal name under which it falls
- District - Enter the District name under which it falls
- State – Enter the name of the state
- Pin Code- Enter the pin code
- Mobile No. – Enter the mobile number of the individual/company
- Telephone No.- Enter the 8 digit official landline number along with STD code
- Fax No.- Enter the fax number
Note 6: Only Street 2, Telephone No. and Faxes No. fields in the section are optional to enter.
- The user needs to enter the following details for the company ‘Financial Information’ section:
- Functional Responsibilities in proposed project – Enter the designation /capacity in which the promoter is engaged in the project
- Assets (Rs. in Lakhs) - Enter the value of total Assets of the promoter
- Liabilities (Rs. in Lakhs) - Enter the value of total Liabilities of the promoter
- Other Assets (Rs. in Lakhs) – Enter the value of other Assets of the promoter
- PAN No. – Enter the PAN number of the promoter
- Details of Immovable Assets, Land and Building etc – Provide brief description of the other fixed assets of the promoter
- Any other Information – Provide any other information on the financial status of the promoter
Note 7: Only PAN No, Details of Immovable Assets, Land and Building etc and Any other Information fields in the section are optional to enter.
- After all the above mentioned details are filled-in, click on the ‘Save & Exit’ button to save the entered details and go back to home link of the dashboard
- Click on the ‘Cancel’ button to quit updating the firm details and navigate back to the home link to the dashboard
Note 8: System will display a confirmation message for quitting the update process on clicking the ‘Cancel’ button
C.4.3 Change Email ID
- Click on the ‘Change Email ID’ link on the dashboard to update any changes in the email ID on which you receive email notification from the APIIC website
- User can also navigate to the ‘Change Email ID’ page of the manage profile screen by clicking on the ‘Change Email ID’ option under the ‘Profile’ link at the top right of the website
- On clicking the ‘Change Email ID’ link on the dashboard , the system displays change email ID form, as indicated in the screenshot below:
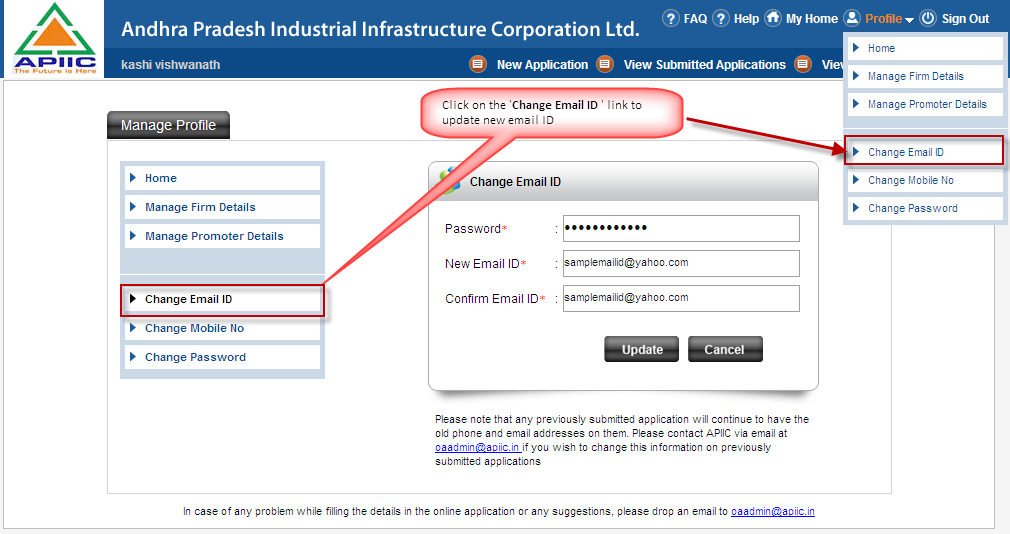
Screen #8: Change Email ID
- User needs to enter the following details in the form to update the email ID :
- Password – Enter the current login password
- New email ID – Enter the new email ID where you wish to receive the email notifications from the website
- Confirm Email ID – Re-enter the new email ID for confirmation
- After all the above mentioned details are filled-in, click on the ‘Update’ button to update change in the system
- The system displays confirmation message on successful update of the email ID
- An email notification and SMS alert is sent to the user on the new email ID and the designated mobile number
- Click on the ‘Cancel’ button to quit the process of updating the email ID
Note 9: System will display a confirmation message for quitting the update process on clicking the ‘Cancel’ button
Note 10: All the fields in the form are mandatory to enter.
C.4.4 Change Mobile No.
- Click on the ‘Change Mobile No.’ link on the dashboard to update any changes in the mobile number on which you receive SMS alerts from the APIIC website.
- User can also navigate to the ‘Change Mobile No.’ Page of the manage profile screen by clicking on the ‘Change Mobile No.’ option under the ‘Profile’ link at the top right of the website
- On clicking the ‘Change Mobile No.’ link on the dashboard , the system displays change mobile no. form, as indicated in the screenshot below:
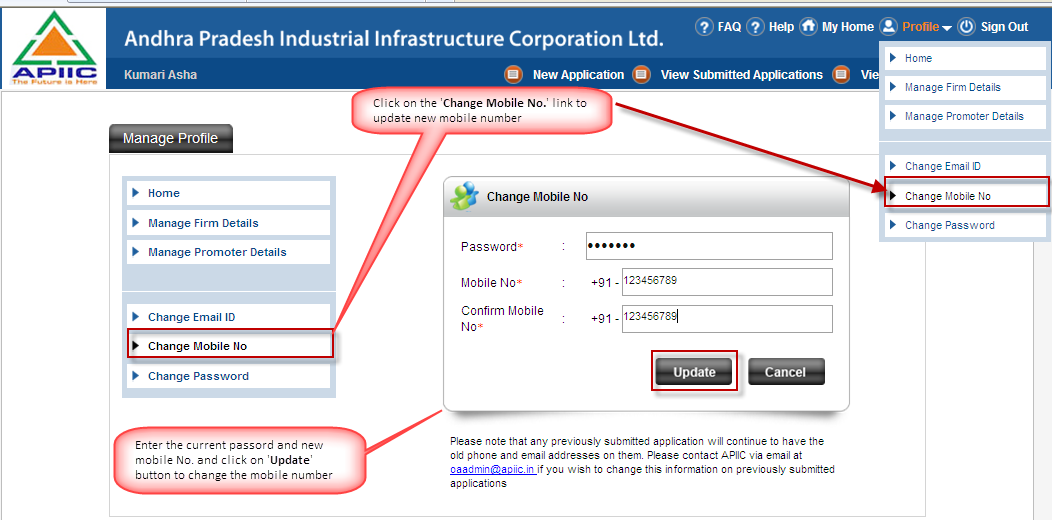
Screen #9: Change Mobile No.
- User needs to enter the following details in the form to update the mobile no.:
- Password – Enter the current login password
- Mobile No. – Enter the new mobile number where you wish to receive the SMS alerts from the website
- Confirm Mobile No. – Re-enter the new mobile number for confirmation
- After all the above mentioned details are filled-in, click on the ‘Update’ button to update change in the system
- The system displays confirmation message on successful update of the mobile number
- An email notification and SMS alert is sent to the user on the new mobile number and designated email ID
- Click on the ‘Cancel’ button to quit the process of updating the mobile number.
Note 11: System will display a confirmation message for quitting the update process on clicking the ‘Cancel’ button
Note 12: All the fields in the form are mandatory to enter.
C.4.5 Change Password
- Click on the ‘Change Password’ link on the dashboard to change the password for logging-in to the APIIC account
- User can also navigate to the ‘Change Password’’ Page of the manage profile screen by clicking on the ‘Change Password’’ option under the ‘Profile’ link at the top right of the website
- On clicking the ‘Change Password’ link on the dashboard , the system displays the change password form, as indicated in the screenshot below:
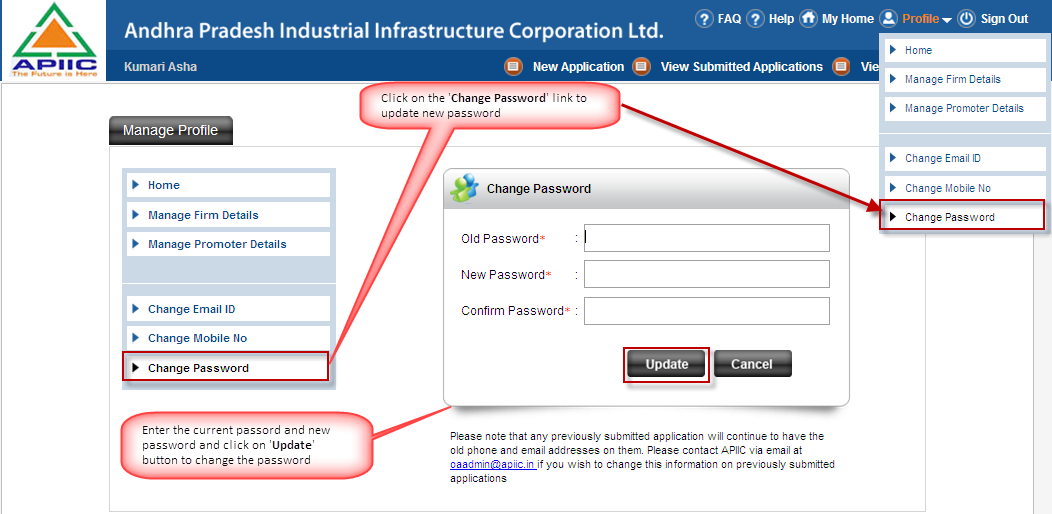
Screen #10: Change Password
- User needs to enter the following details in the form to update the email ID :
- Old Password – Enter the current login password
- New Password – Enter the new password you wish to login to APIIC account
- Confirm Password. – Re-enter the new password for confirmation
- After all the above mentioned details are filled-in, click on the ‘Update’ button to update change in the system
- The system displays confirmation message on successful update of the password
- An email notification and SMS alert is sent to the user on the designated email ID and mobile number
- Click on the ‘Cancel’ button to quit the process of updating the password
Note 13: System will display a confirmation message for quitting the update process on clicking the ‘Cancel’ button
Note 14: All the fields in the form are mandatory to enter.
C.5 New Application
- Click on the ‘ New Application ‘ link /button on the ‘My Home’ screen to create a new Application to seek allotment of plots/sheds/shops/godowns to set- up industries/Businesses or common use facility for industries; the same is indicated in the screenshot below:
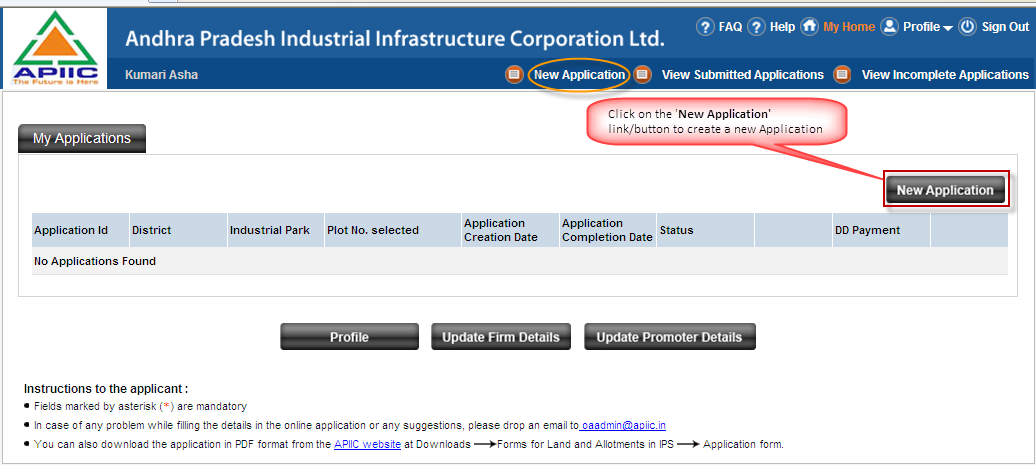
Screen #11: My Home- New Application link
- On clicking the ‘New Application’ link button, the system displays the following screen explaining the terms and conditions of submitting and processing the Applications for allotment :
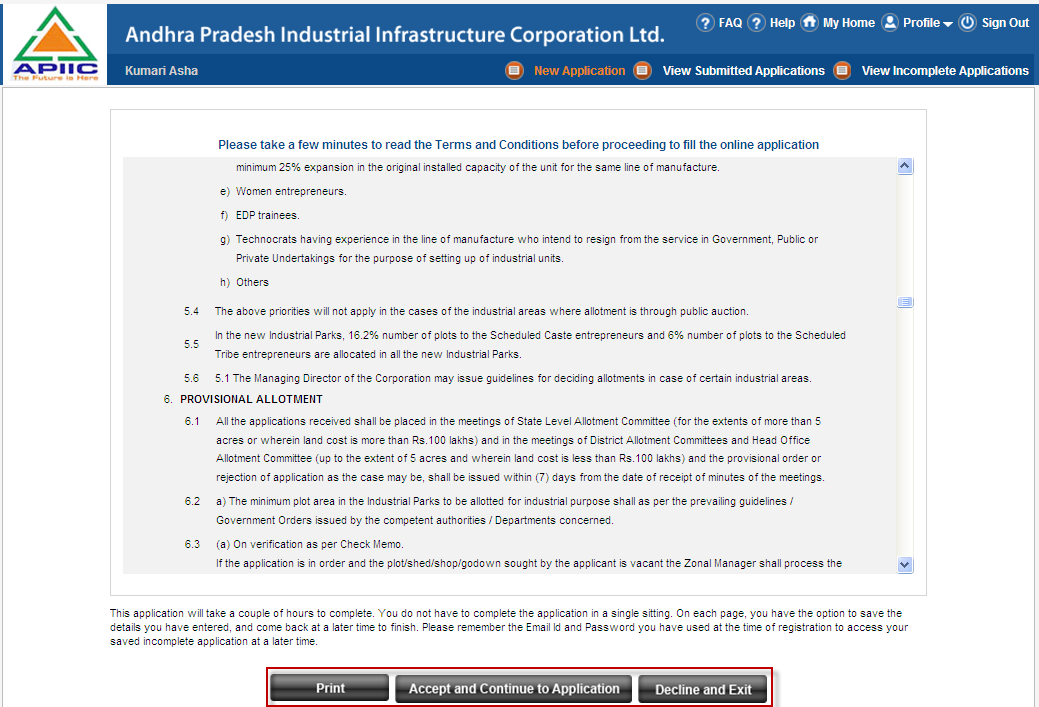
Screen #12: New Application- Terms and Conditions
- Read the mentioned Terms and Conditions and click on the ‘ Accept and Continue to Application’ button to confirm that you understand the terms and conditions and to proceed further with the Application
- Click on the ‘Decline and Exit ’ button to quit creating the Application and go back to the ‘ My Home ‘ screen
- Click on the ‘ Print’ button to print the terms and conditions
- On clicking the ‘Print’ button, the system opens the terms and condition in a new window with a print icon to give the print command, the same is indicated in the screenshot below:
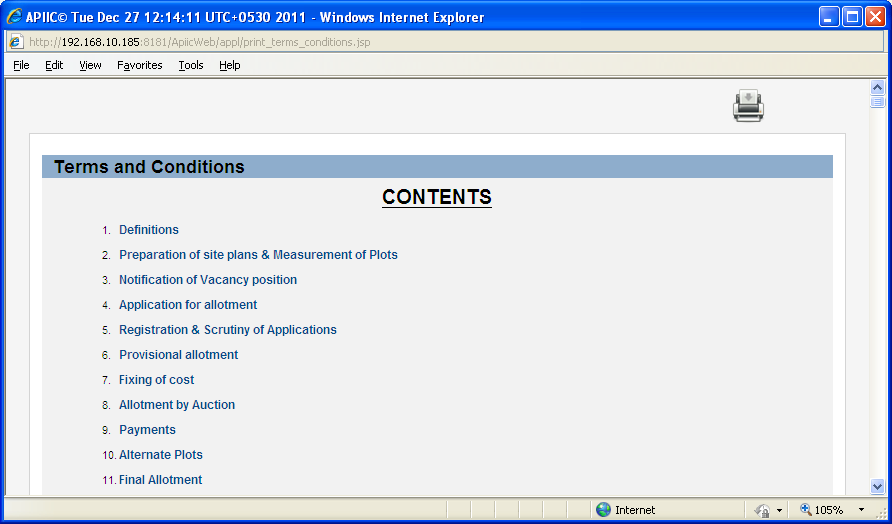
Screen #13: New Application- Print Terms and Condition
- Click on the Print icon to give the print command to the printer and set the print options.
C.5.1 New Application – Plot Details – Step 1
- On clicking the ‘Accept and continue to Application’ button on the Terms and Conditions page, the system displays the ‘Plot Detail’ page of the new application
- The Plot details page is divided into 2 tabs:
- Select
- Verify and Confirm
- Click on the ‘Select’ tab to enter the details of the plot you seek for allocation, the system displays the plot information screen, as indicated in the screenshot below:
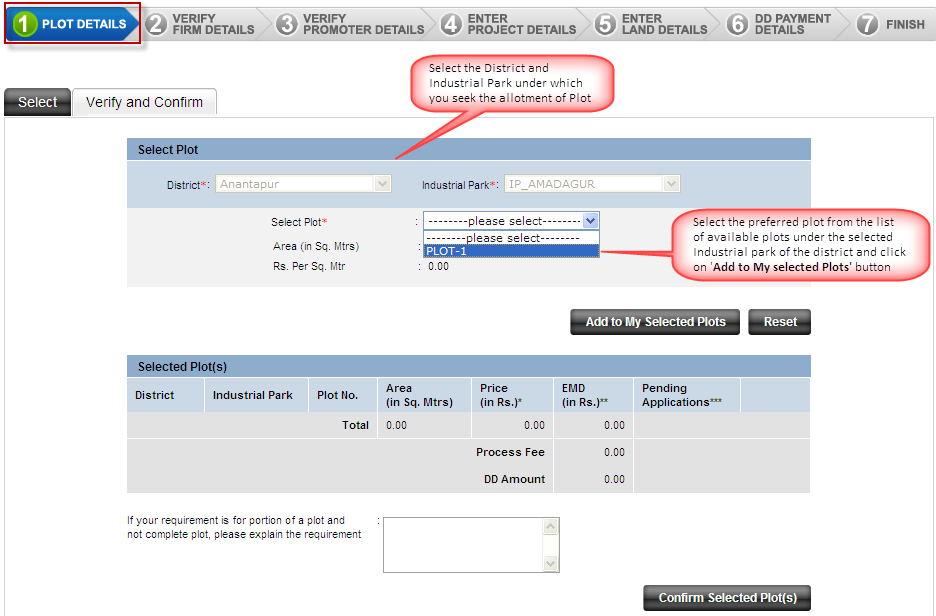
Screen #14: New Application- Plot Details- Select tab-1
- The plot information page is further divided into the below 2 sections:
- Select Plot
- Selected Plot(s)
C.5.1.1 Select
- User needs to provide the following details under the ‘Select Plot’ section:
- District – <Drop down> - Select the District from the dropdown list, under which you seek the plot(s) for allotment
- Industrial Park –<Drop down> - Select the Industrial Park from the dropdown list ,under which seek the plot(s) for allotment
- Click on the ‘Go’ button besides the ‘Industrial Park’ Dropdown field ,the system generates the list of available plot available under the industrial park and displays in the ‘Select Plot ‘ dropdown list
- Once the ‘Go’ button is clicked the District and Industrial park dropdowns are freezed and disabled
- Select Plot – <Drop down> -Select the plot (s) for which you seek allotment
- Once the plot is selected , the system displays the Area and price per unit of the selected plot
- Area( in Sq. Mtrs) - <auto-populated display field> - the system displays the area of the plot in Square meters
- Rs. Per Sq. Mtr - <auto-populated display field> - the system displays the price per square meter area of the plot
- Click on the ‘Reset’ button to discard the selections and reselect the district , IP and plot(s)
Note 15: System will display a confirmation message for discarding d the plot selection
Note 16: User can apply for multiple plots under the selected district and industrial park in a single application
- Click on the ‘Add to My Selected Plots’ button to add the selected plot to list of selected plot(s), the same gets displayed under the ‘Selected Plot(s)’ section
- The system displays the following details of the selected plots under the ‘Selected Plot(s)’ section : as indicated in the screenshot below:
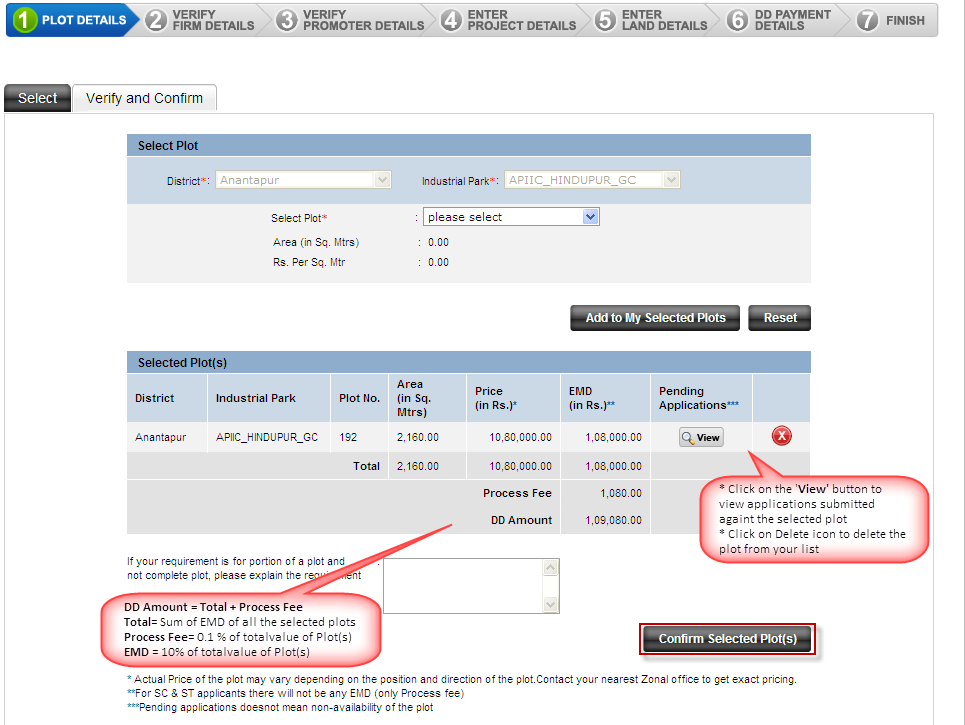
Screen #15: New Application- Plot Details- Select tab-1
- District – District under which the plot is selected for allotment
- Industrial Park – Industrial park under which the plot is selected for allotment
- Area (in Sq.Mtrs ) – Area of the plot
- Price (in Rs) - Price of the Plot
- EMD (in Rs.) – the Earnest money deposit which is required to be deposited with APIIC to consider the Application for allotment of the selected plot(s)
Where, EMD =10% of the value of the plot
- Pending Application – It displays the link to view the pending applications under consideration for the allotment of the same plot
- Delete – It displays the link to delete the selected plot
- The system calculates and displays the following values:
- Total Area (in Sq Mtrs)= Sum of Area of all the selected Plots
- Total Price (in Rs) – Sum of Prices of all the selected plots
- Total EMD = Sum of EMD of all the selected plots
- Process Fee = 0.1 % of the Total price of all the selected plots
- DD Amount = Total EMD + Process Fee
Note 17: Applicants seeking allotment under the SC/ST category are exempted from paying the processing fee.
- DD Amount is the Amount payable to APIIC which is deposited along with the Application
- Enter any additional specifications regarding the requirement of the plots
Note 18: If the applicant is seeking only a portion of the plot and not the complete plot, then specifying the same is mandatory under additional specifications
- Click on the ‘Confirm Selected Plot(s)’ to validate the plots selected for allotment.
C.5.1.2 Verify and Confirm
- On clicking the ‘Confirm Selected Plot(s)’, the selected plots are freezed for the application for allotment and the system displays the plot details for re-confirmation, as indicated in the screenshot below:
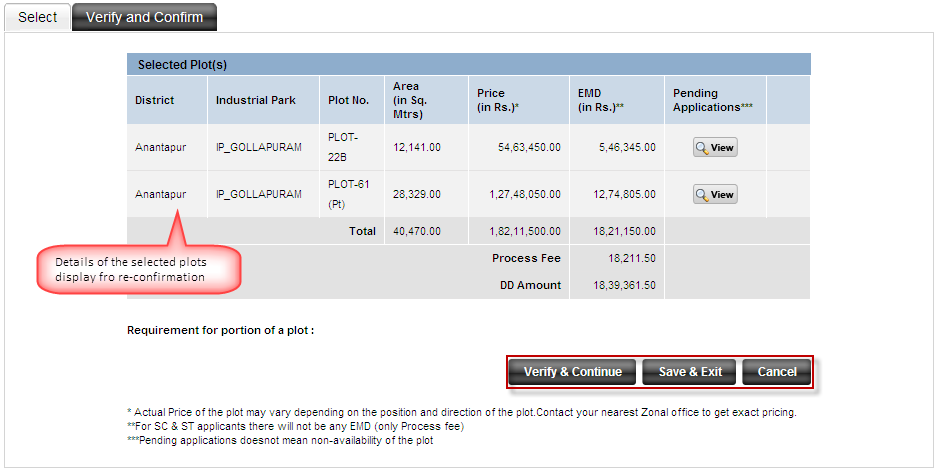
Screen #16: New Application- Plot Details- Verify and Confirm tab-2
- Verify the plot details , reconfirm on the same and click on the ‘Verify & Continue’ button to proceed to the next step of online Application
- Click on ‘Save & Exit’ to save the plot details and quit to go back to the ‘My Home ‘ screen
- Click on ‘Cancel’ button to quit the process of updating the Application and go back to the ‘My Home’ screen
Note 19: System will display a confirmation message for quitting the update process on clicking the ‘Cancel’ button
Note 20: User needs to enter the details in the select tab to move to the next tab
Note 21: User needs to complete the Step-1 before proceeding to the step -2 which is ‘Verify Firm Details’
C.5.2 New Application – Verify Firm Details– Step 2
- On clicking the ‘Verify & Continue ‘ button or on the ‘Verify Firm details ‘ tab on the top navigation bar , the system will display the Firm Registration form , as indicated in the screenshot below:
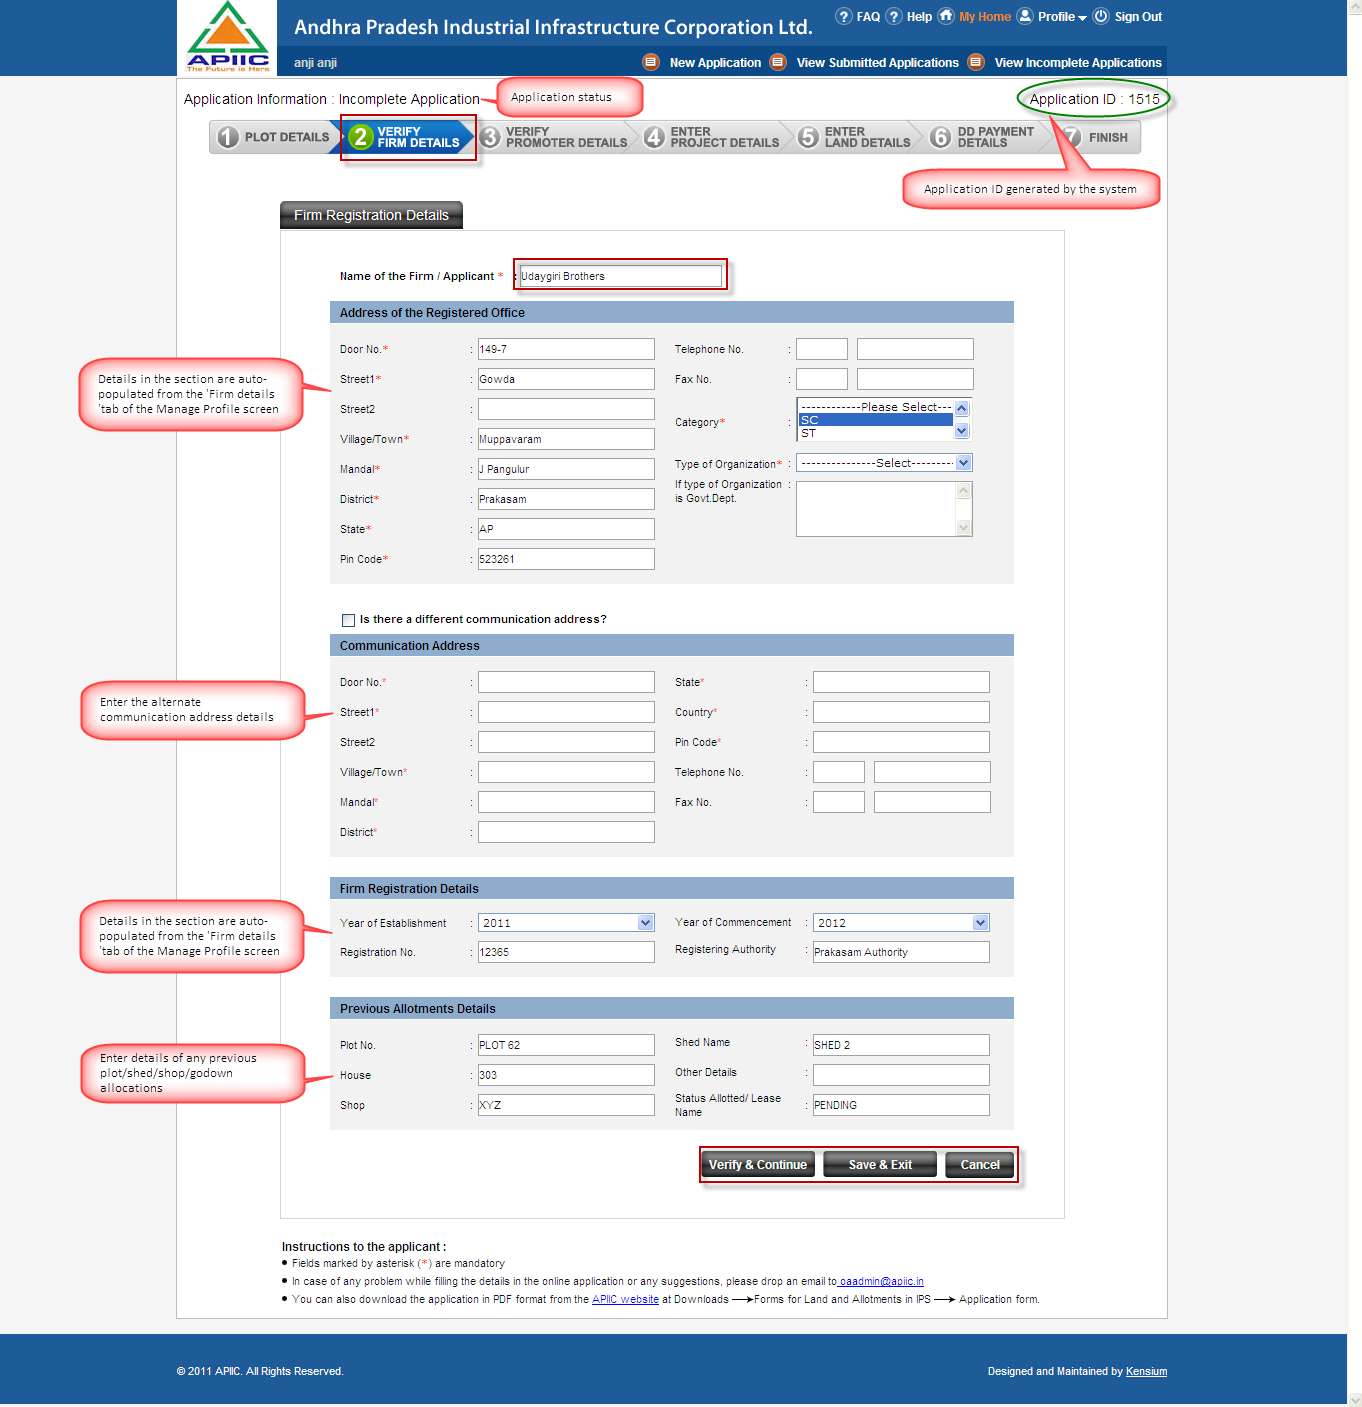
Screen #17: New Application- Verify Firm Details
- The Firm Registration Form is divided into the following sections:
- Address of the Registered Office
- Communication Address
- Firm Registration Details
- Previous Allotment Details
- Name of the Firm/Applicant – Enter your name or the name of the firm for which you seek allotment
- Address of the Registered Office
- If the user has already entered the ‘Firm Details ‘ in the Manage Profile screen , then this section will be displayed as prefilled and user can update the details if there are any changes in the address of the registered office
- If the user has not updated the ‘Firm Details’ in the Manage Profile Screen before creating the Application, then user needs to enter the details but the same will be applicable for this particular Application and will not be reflected in the ‘Manage Firm Details’ screen
Note 22: Please refer to section 3.3.1.1 ‘Manage Firm Details’, for more information on ‘Address of the Registered Office.
- Category – Select the category to
which the user belongs from the following options:
- SC
- ST
- Technocrat
- Ex service
- Women
- General
- Resigned from service
- Type of Organization – Select the type
of your organization from the following options:
- Proprietary Concern
- Partnership firm
- Private ltd. co.
- Public ltd. co.
- Co-op society
- LLP
- Government. Dept.
- If type of organization is Govt. Dept.- if the user selects the type of organization as ‘Government Dept. ‘ then this input box is enabled to enter description
- Is there a different communication Address – Check the check box if there is an alternate communication address
- Communication Address
User needs to enter the following details under this section:
- Door No.- Enter the door number
- Street 1 - Enter the additional address details
- Street 2 - Enter the additional address details
- Village /Town - Enter the village / Town name in which it is located
- Mandal - Enter the Mandal name under which it falls
- District - Enter the District name under which it falls
- State – Enter the name of the state
- Country- Enter the name of the country
- Pin Code- Enter the pin code
- Telephone No.- Enter the 8 digit official landline number along with STD code
- Fax No.- Enter the fax number
Note 23: Only Street 2, Telephone No. and Faxes No. in the section are optional to enter.
- Registration Details
- If the user has already entered the ‘Firm Details ‘ in the Manage Profile screen , then this section will be displayed as prefilled and user can update the details if there are any changes in the registration details
- If the user has not updated the ‘Firm Details’ in the Manage Profile Screen before creating the Application, then user needs to enter the details but the same will be applicable only for this particular Application and will not be reflected in the ‘Manage Firm Details’ screen
Note 24: Please refer to section 3.3.1.1 ‘Manage Firm Details’, for more information on ‘Registration details’.
Note 25: If the type of organization selected under the ‘Address of the Registered Office’ section is ‘Proprietary Concern’, then the registration details are optional to enter. For other types of organization registration details are mandatory.
- Previous Allotment Details
User needs to enter the following details under this section:
- Plot No.- Enter the plot no. of any previous allotment
- House No – Enter house no. of any previous allotment
- Shop – Enter the shop no. of any previous allotment
- Shed Name – Enter the shed name of any previous allotment
- Other Details – Enter any other details any previous allotment
- Status Allotted /Lease Name – Enter the allotted status pt lease name
- Click on the ‘Verify & Continue’ button to proceed to the next step of online Application that is ‘Verify Promoter Details’
- Click on ‘Save & Exit’ to save the firm details and quit to go back to the ‘My Home ‘ screen
- Click on ‘Cancel’ button to quit the process of updating the Application and go back to the ‘My Home’ screen
Note 26: System will display a confirmation message for quitting the update process on clicking the ‘Cancel’ button
Note 27: User needs to complete the Step-2 before proceeding to the step -2 which is ‘Verify Promoter Details’
C.5.3 New Application – Verify Promoter Details – Step 3
- On clicking the ‘Verify & Continue’ button in the ‘Verify Firm details’ screen or on the ‘Verify Promoter Details’ on the top navigation bar, the system will display the ‘Key Promoter’ form , as indicated in the screenshot below:
Screen #18: New Application- Verify Promoter Details- Key Promoter
- The Verify promoter detail is divided into the following 2 tabs:
- Key Promoter
- Additional Promoter(s)
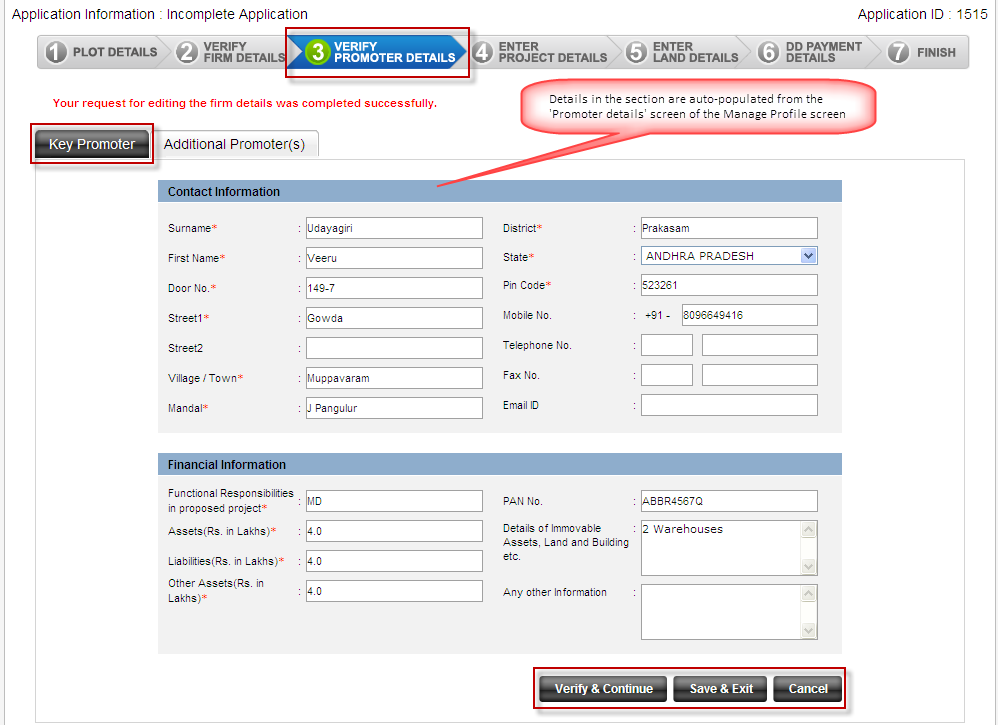
C.5.3.1 Key Promoter
- The’ Key Promoter Form’ is divided into the following sections:
- Contact information
- Financial information
- If the user has already entered the Promoter Details in the Manage Profile screen , then the key promoter form will be displayed as prefilled and user can update the details if there are any changes
- If the user has not updated the Promoter Details in the Manage Profile Screen before creating the Application, then user needs to enter the promoter details but the same will be applicable only for this particular Application and will not be reflected in the ‘Manage Promoter Details’ screen
Note 28: Please refer to section 3.3.1.2 ‘Manage Promoter Details’, for more information on promoter details.
- Click on the ‘Verify & Continue’ button to proceed to the next tab that is ‘Additional Promoter(s)’
- Click on ‘Save & Exit’ to save the firm details and quit to go back to the ‘My Home ‘ screen
- Click on ‘Cancel’ button to quit the process of updating the Application and go back to the ‘My Home’ screen
Note 29: System will display a confirmation message for quitting the update process on clicking the ‘Cancel’ button
C.5.3.2 Additional Promoter(s)
- The ‘Additional Promoter(s)’ form displays 3 rows to enter the details of the additional promoter, the same is indicated in the screenshot below:

Screen #19: New Application- Verify Promoter Details- Additional Promoter(s)
Note30: The additional promoter details are optional to enter.
- The user needs to enter the following details of the additional promoters in each row:
- Name- Enter the name of the additional promoter
- Address - Enter the address of the additional promoter
- Contact No.- Enter the 10 digit mobile number of the additional promoter
- Qualification – Enter the educational qualification of the of the additional promoter
- Experience(Years) – Enter the totals number of years of experience of the additional promoter
- Net Worth (Rs. In crores) – Enter the value of the total assets of the additional promoter
- User can delete a filled-in row by clicking on delete icon
Note 31: The system displays confirmation message before deleting the row
Note 32: The system does not allow users to delete an empty row
- Click on the ‘Add More Rows’ button to add more promoters and 3 rows get displayed to enter the details
NNote 33:The system displays confirmation message before adding the rows
NNote 34: User needs to enter the details in the key promoter tab to move to the next tab ‘additional promoter(s)
- Click on the ‘Verify & Continue’ button to proceed to the next step of the online Application that is project details
- Click on ‘Save & Exit’ to save the promoter details and quit to go back to the ‘My Home ‘ screen
- Click on ‘Cancel’ button to quit the process of updating the Application and go back to the ‘My Home’ screen
Note 35: System will display a confirmation message for quitting the update process on clicking the ‘Cancel’ button
Note 36: User needs to complete the Step-3 before proceeding to the step -4 which is ‘Enter Project Details’
C.5.4 New Application – Enter Project Details – Step 4
- On Clicking the ‘Verify & Continue’ button in the promoter details screen or on the ‘Enter Project details’ on the top navigation bar, the system will display Project details page, as indicated in the screenshot below:
Screen #20: New Application- Enter Project Details- General
- The project details are divided into the following 5 tabs:
- General
- Financial
- Employment
- Material and Manufacturing process
- Plant and Machinery
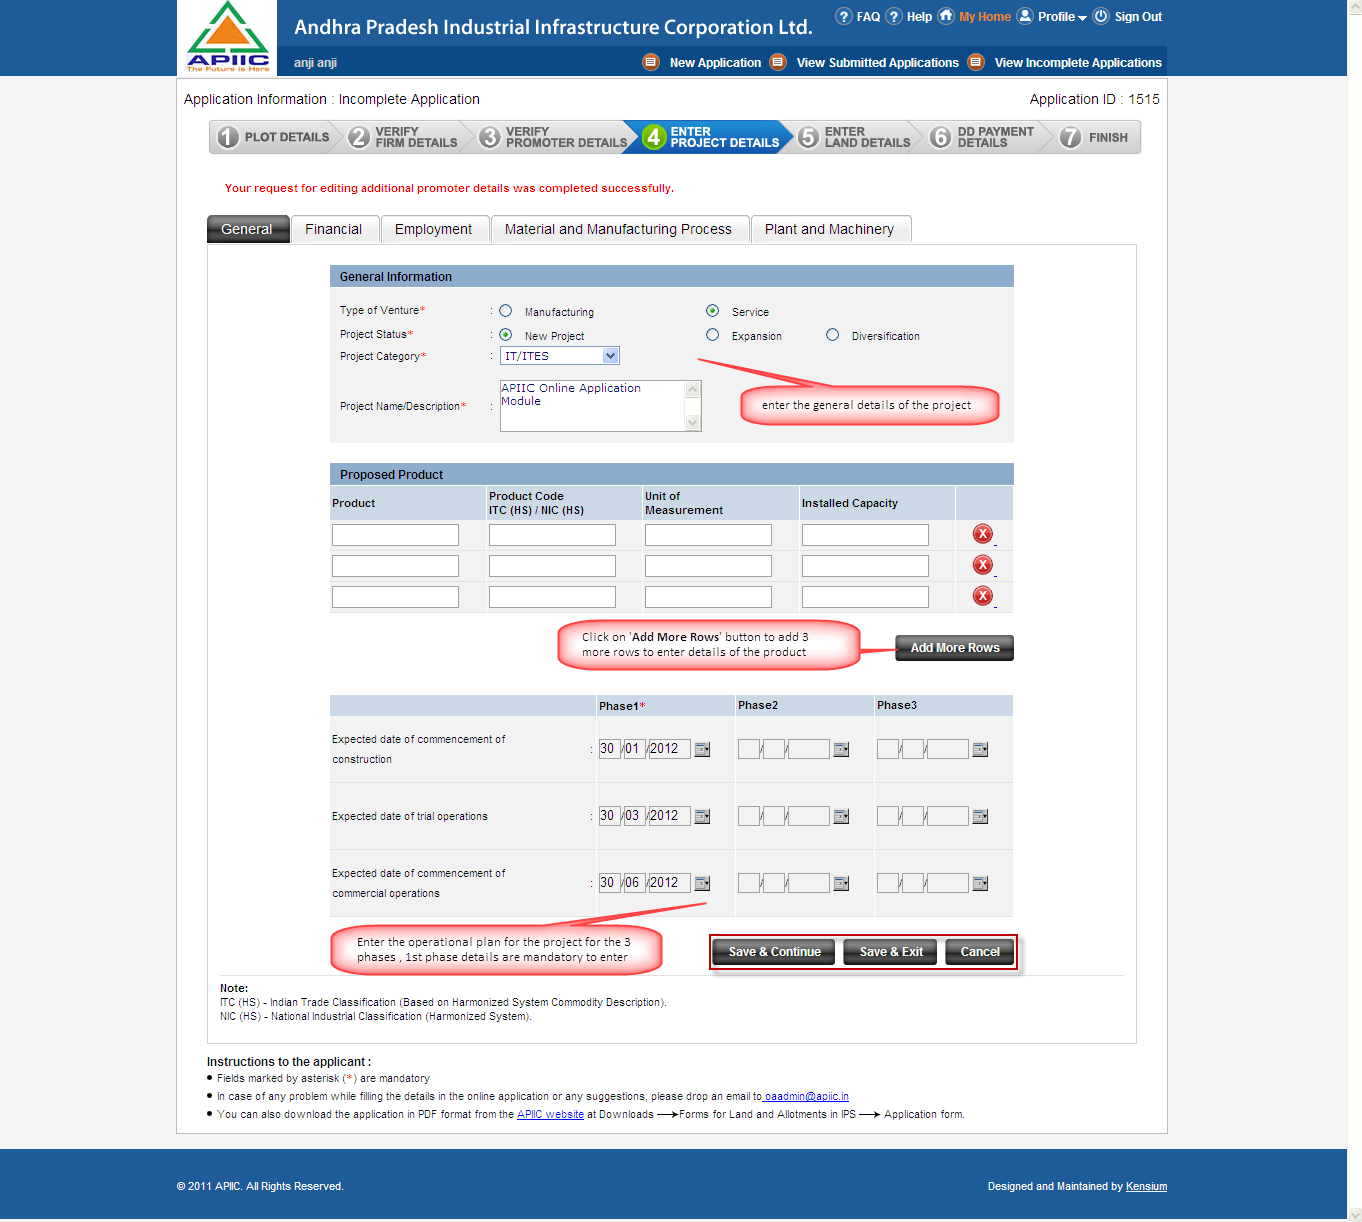
C.5.4.1 General
- The ‘General’ tab is further divided into the following sections:
- General Information
- Proposed product
- User needs to enter the following details under the ‘General Information’ section:
- Type Venture - specify if the proposed project is a manufacturing or service venture
- Project Status – specify if the proposed project is a new project/Expansion or Diversification
- Project Category- Select the category of the project from the available options
- Project Name /Description- Enter the name and details of the proposed project
Note 37: All the details under this section is mandatory to enter
- User needs to enter the following details under the ‘Proposed Products’ section:
- Product – Enter the proposed product name
- Product Code ITC (HS) / NIC (HS) - Enter the code of the proposed product
- Unit of Measurement - Enter the unit of measurement for the proposed product
- Installed Capacity - Enter the installed capacity for producing the proposed product
- User can delete a filled-in row by clicking on delete icon
Note 38: The system displays confirmation message before deleting the row
Note 39: The system does not allow users to delete an empty row
- Click on the ‘Add More Rows’ button to add more productd and 3 rows get displayed to enter the product details
NNote 40: The system displays confirmation message before adding the rows
NNote 41: The above details about the product are optional to enter
- Expected date of commencement of construction – Enter the Date on which the proposed project is planned to begin the construction
- Expected date of trial operations – Enter the Date on which the trial operation of the proposed project are planned to begin
- Expected date of commencement of commercial operations – Enter the date on which the commercial operations of the proposed project are planned to begin
NNote 42: The user can enter the above details of the project plan for 3 phases with phase 1 details mandatory to enter
NNote 43: All the dates should be future dates and cannot be a past date
Note44: The trial operation date should be greater than the construction commencement date for each phase
NNote 45: The commercial operation commencement date should be greater than the trial operation date and construction commencement date
- Click on the ‘Save & Continue’ button to proceed to the next tab which is financial details of the project
- Click on ‘Save & Exit’ to save the firm details and quit to go back to the ‘My Home ‘ screen
- Click on ‘Cancel’ button to quit the process of updating the Application and go back to the ‘My Home’ screen
Note 46: System will display a confirmation message for quitting the update process on clicking the ‘Cancel’ button
NNote 47: User needs to update the general details tab before moving to the next tab which is ‘Financial’
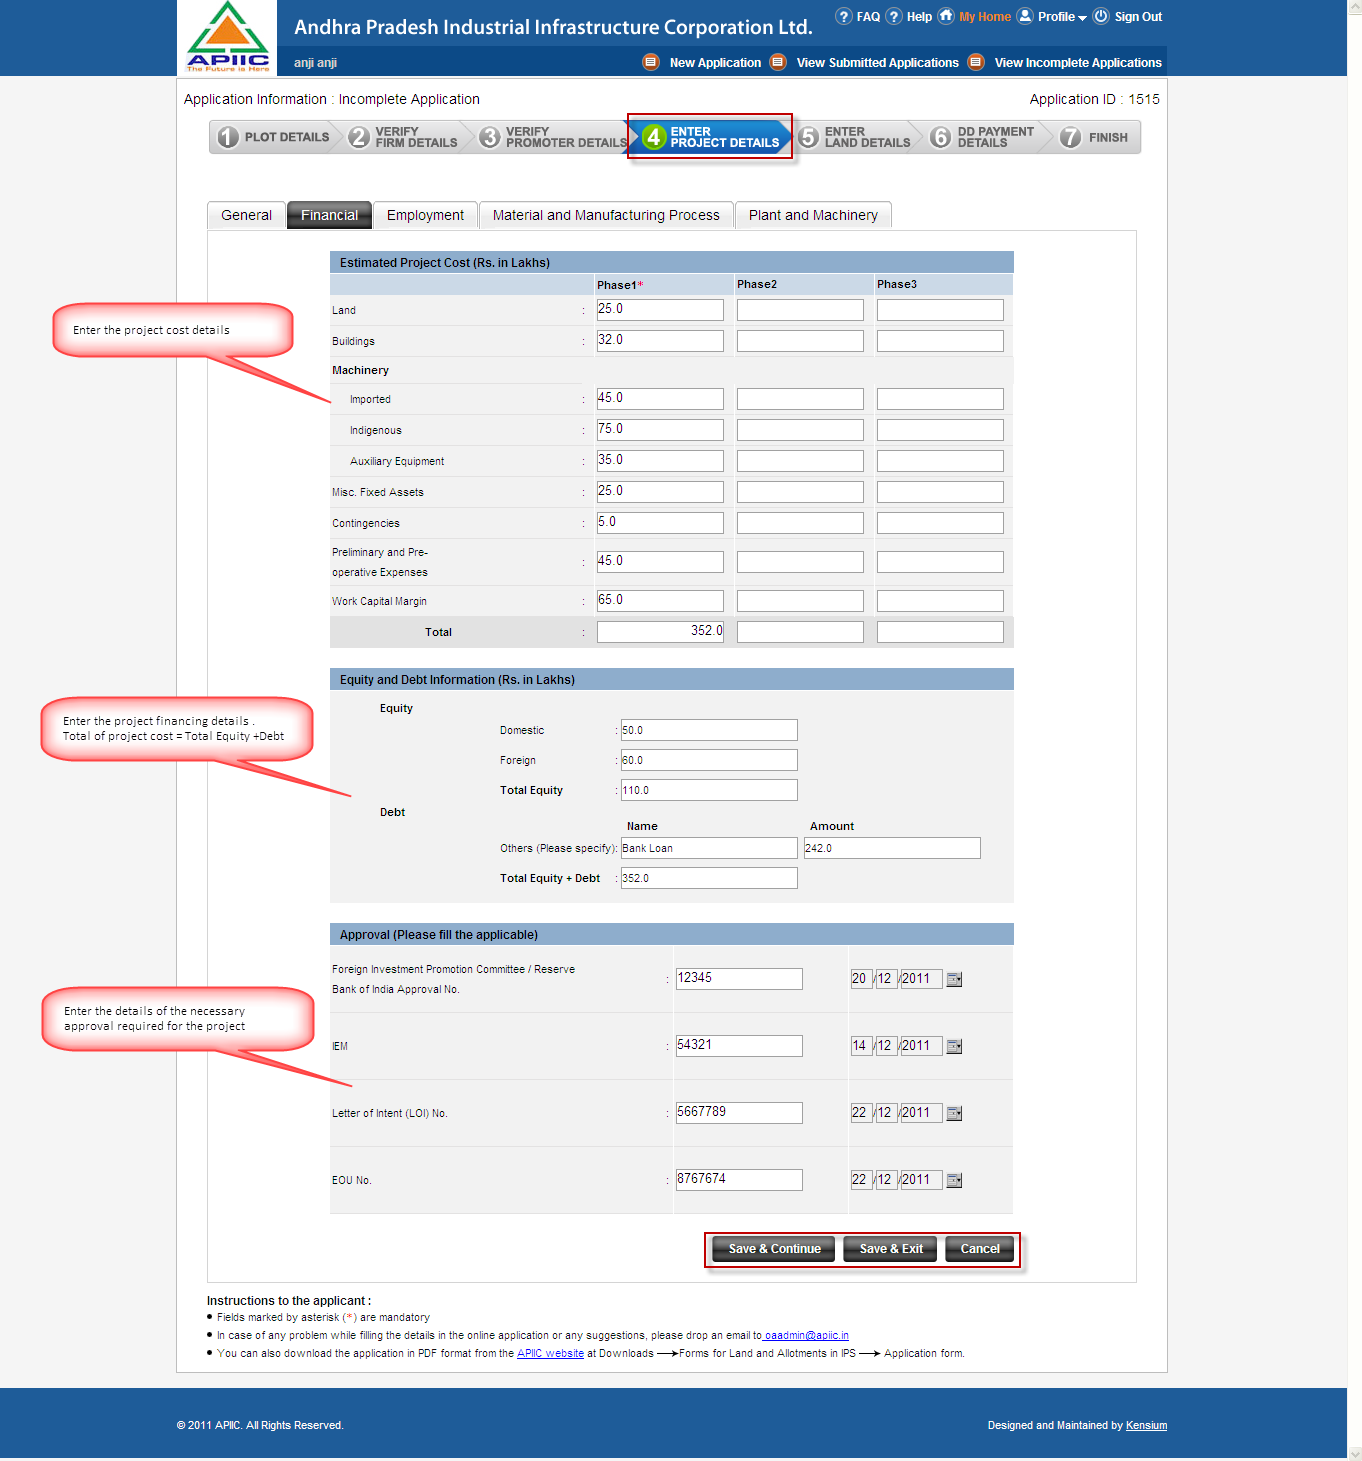
C.5.4.2 Financial
- The ‘Financial’ tab is further divided into the following sections:
- Estimated Project Cost (Rs. in Lakhs)
- Equity and Debt Information (Rs. in Lakhs)
- Estimated Project Cost (Rs. in Lakhs)
- Estimated Project Cost (Rs. in Lakhs)
- Estimated Project Cost (Rs. In Lakhs)
- Equity and Debt Information (Rs. in Lakhs)
- Equity and Debt information (Rs. In Lakhs)
- Approval (Please fill the applicable)
Screen #21: New Application- Enter Project Details- Financial
- User needs to enter the following details under the ‘Estimated Project Cost’ section:
- Land – Enter the value of the land to be engaged in the project
- Buildings - Enter the value of the land of the building to be engaged in the project
- Machinery
- Imported- Enter the value of the imported machinery to be employed in the project
- Indigenous- Enter the value of the indigenous machinery to be employed in the project
- Auxiliary Equipment - Enter the value of the auxiliary equipments to be employed in the project
- Misc. Fixed Assets - Enter the value of any miscellaneous fixed assets to be employed in the project
- Contingencies – Enter the value of any contingencies to be used in the project
- Preliminary and Pre-operative Expenses – Enter the value for the expected preliminary and pre-operative costs
- Work Capital Margin – Enter the value of the expected working capital requirement for the different phases of the project
- Total- It is the sum of all the values entered in this section and is auto-calculated by the system
NNote 48: The user can enter the above details of the project plan for 3 phases with phase 1 details mandatory to enter
- User needs to enter the following details under the ‘Equity and Debt information ‘section:
- Equity
- Domestic- Enter the value of the domestic equity to be employed in the project
- Foreign - Enter the value of the foreign equity to be employed in the project
- Total Equity –It is the sum of the values of the domestic and foreign equity and is auto-calculated by the system
- Debt
- Others (Please specify) – Enter the name and value of the debt amount to be employed in the project
- Total Equity + Debt- It the sum of the total value of the equity and the debts and is auto-calculated by the system
NNote 49: The Equity and debt information is optional to enter but once the details are entered then it should follow the rule that:
Total Equity + Debt = Total project cost
- User needs to enter the following details under the ‘Approvals’ section:
- Foreign Investment Promotion Committee / Reserve Bank of India Approval No.- Enter the number and date of approval if applicable
- IEM- Enter the number and date of approval of IEM ,if applicable
- Letter of Intent (LOI) No.- Enter the number and date of approval of LOI, if applicable
- EOU No.- Enter the number and date of approval of EOU
Note 50: The Approval details are optional to enter.
Note 51: If the approval details are entered, then both number and date are mandatory to enter.
Note 52: All the dates entered should be a past dates i.e lesser than the current date.
Note 53: The system displays validation message to check for the all the mentioned conditions under the section.
- Click on the ‘Save & Continue’ button to proceed to the next tab which is Employment details of the project
- Click on ‘Save & Exit’ to save the firm details and quit to go back to the ‘My Home ‘ screen
- Click on ‘Cancel’ button to quit the process of updating the Application and go back to the ‘My Home’ screen
Note 54: System will display a confirmation message for quitting the update process on clicking the ‘Cancel’ button
NNote 55: User needs to update the financial details tab before moving to the next tab which is ‘Employment ‘
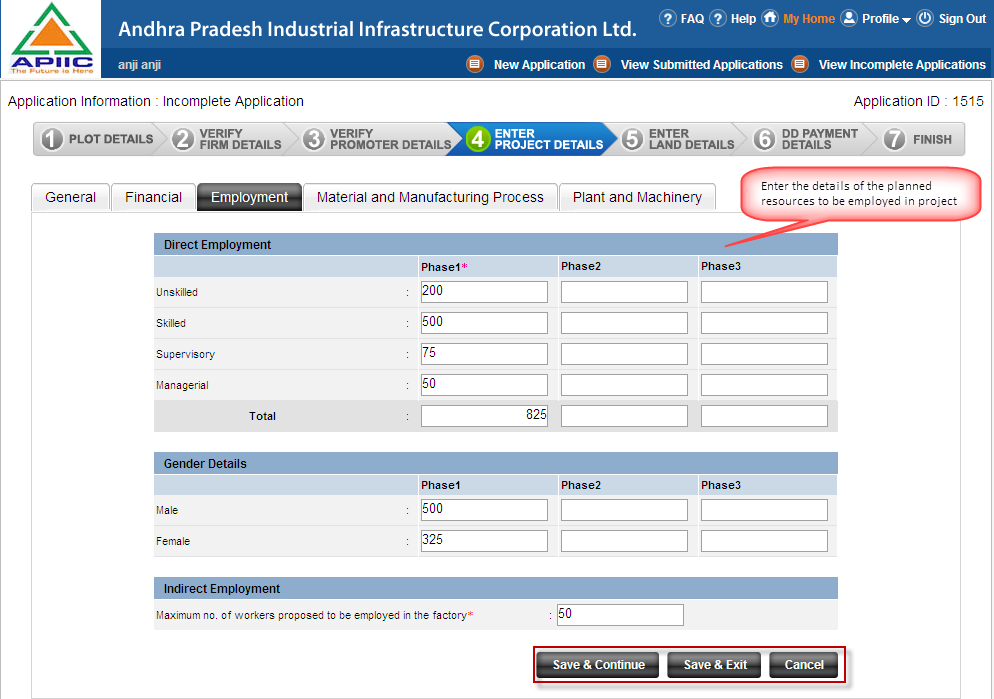
C.5.4.3 Employment
- The ‘Employment’ tab is further divided into the following sections:
- Direct Employment
- Gender Details
- Indirect Employment
Screen #22: New Application- Enter Project Details- Employment
- User needs to enter the following details under the ‘Direct Employment’ section:
- Unskilled- Enter the number of planned unskilled workers to be employed for the project
- Skilled - Enter the number of planned skilled workers to be employed for the project
- Supervisory - Enter the number of workers planned to be employed for the supervisory roles in the project
- Managerial - Enter the number of workers planned to be employed for the managerial roles in the project
- Total- It is the sum of the number of all the workers planned to be employed as a part of direct employment in the project and is auto- calculated by the system
NNote 56: The user can enter the above details of the project plan for 3 phases with phase 1 details mandatory to enter
- User needs to enter the following details under the ‘Gender Details’ section:
- Male- Enter the number of male worker planned to be employed as a part of direct employment in the project
- Female – The system auto-calculates the number of female worker planned to be employed as a part of direct employment as per the below formula:
Female = Total number of direct worker- Male
NNote 57: The gender details section is optional to enter for all the phases.
- User needs to enter the following details under the ‘Indirect Employment ‘section:
- Maximum no. of workers proposed to be employed in the factory- Enter the planned number of workers to be employed as a part of indirect employment in the project
NNote 58: It is mandatory to enter the indirect employment details.
- Click on the ‘Save & Continue’ button to proceed to the next tab which is material and manufacturing process of the project
- Click on ‘Save & Exit’ to save the firm details and quit to go back to the ‘My Home ‘ screen
- Click on ‘Cancel’ button to quit the process of updating the Application and go back to the ‘My Home’ screen
Note 59: System will display a confirmation message for quitting the update process on clicking the ‘Cancel’ button
NNote 60: User needs to update the Employment details tab before moving to the next tab which is ‘Material and Manufacturing Process’
C.5.4.4 Material and Manufacturing Process
- The ‘Material and Manufacturing process ‘tab is further divided into the following sections:
- Raw Material Consumption
- Manufacturing Process
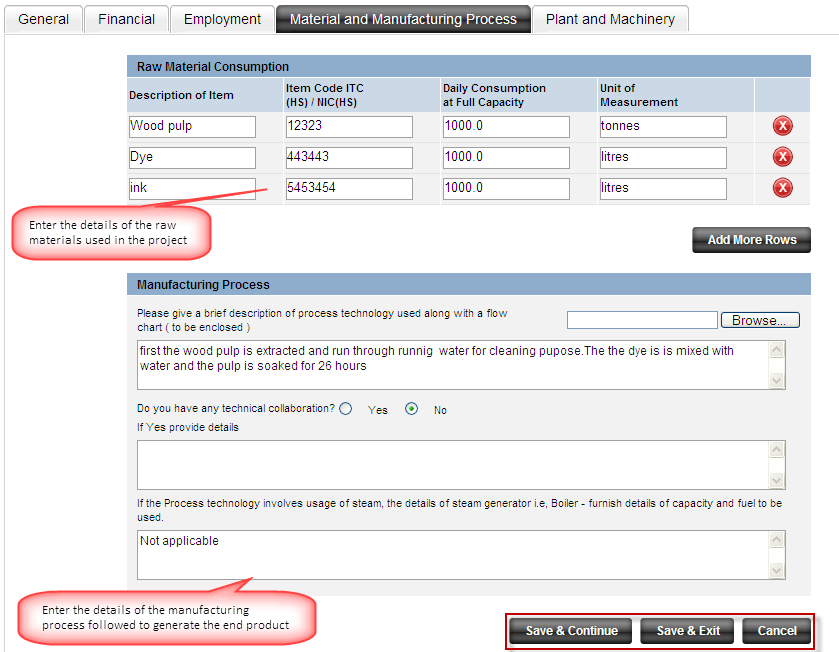
Screen #23: New Application- Enter Project Details- Material and Manufacturing process
- User needs to enter the following details under the ‘Raw Material Consumption’ section:
- Description of Item – Enter the Name/description of the raw material to be used to manufacture the end product
- Item Code ITC (HS) / NIC(HS) - Enter the raw material item code as per the ITC or NIC product classification
- Daily Consumption at Full Capacity- Enter the planned daily consumption of the raw material in full capacity of manufacturing operations
- Unit of Measurement – Enter the unit of measurement of the raw material for daily consumption
- User can delete a filled-in row by clicking on delete icon
Note 61: The system displays confirmation message before deleting the row
Note 62: The system does not allow users to delete an empty row
Note 63: The raw material section is optional to enter
- Click on the ‘Add More Rows’ button to add more raw material product details and 3 rows get displayed to enter the details
- User needs to enter the following details under the ‘Manufacturing Process ‘ section:
- Brief description of process technology used for manufacturing the end product along with a flow chart
- Mention if the you have any technical collaboration for the manufacturing process, if yes then enter the details of the same
- Mention If the Process technology involves usage of steam, if applicable then enter the details of steam generator i.e, Boiler and provide the details of capacity and fuel to be used.
Note 64: The ‘manufacturing process’ section is optional to enter
- Click on the ‘Save & Continue’ button to proceed to the next tab which is ‘Plant and machinery ‘
- Click on ‘Save & Exit’ to save the firm details and quit to go back to the ‘My Home ‘ screen
- Click on ‘Cancel’ button to quit the process of updating the Application and go back to the ‘My Home’ screen
Note 65: System will display a confirmation message for quitting the update process on clicking the ‘Cancel’ button
NNote 66: User needs to update the Material and Manufacturing Process details tab before moving to the next tab which is ‘Plant and machinery’
C.5.4.5 Plant and Machinery
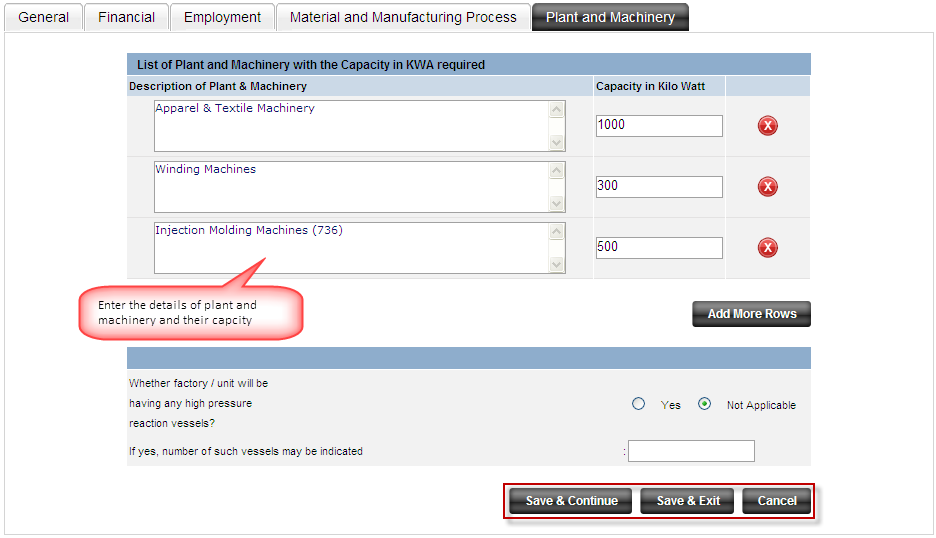
Screen #24: New Application- Enter Project Details- Plant and Machinery
- Enter the list of plant and machinery and the details of their capacity in terms of the power requirement in Kilowatt
- User can enter multiple plant and machinery details and also delete a filled-in row by clicking on delete icon
Note 67: The system displays confirmation message before deleting the row
Note 68: The system does not allow users to delete an empty row
Note 69: The plant and machinery details are optional to enter
- Mention If the factory or the manufacturing unit will engage any high pressure reaction vessel , if yes then enter the number of such vessels that are planned to be used
- Click on the ‘Save & Continue’ button to proceed to the next step of the online application which is Land Details
- Click on ‘Save & Exit’ to save the firm details and quit to go back to the ‘My Home ‘ screen
- Click on ‘Cancel’ button to quit the process of updating the Application and go back to the ‘My Home’ screen
Note 70: System will display a confirmation message for quitting the update process on clicking the ‘Cancel’ button
Note 71: User needs to complete the Step-4 before proceeding to the step -5 which is ‘Enter Land Details’
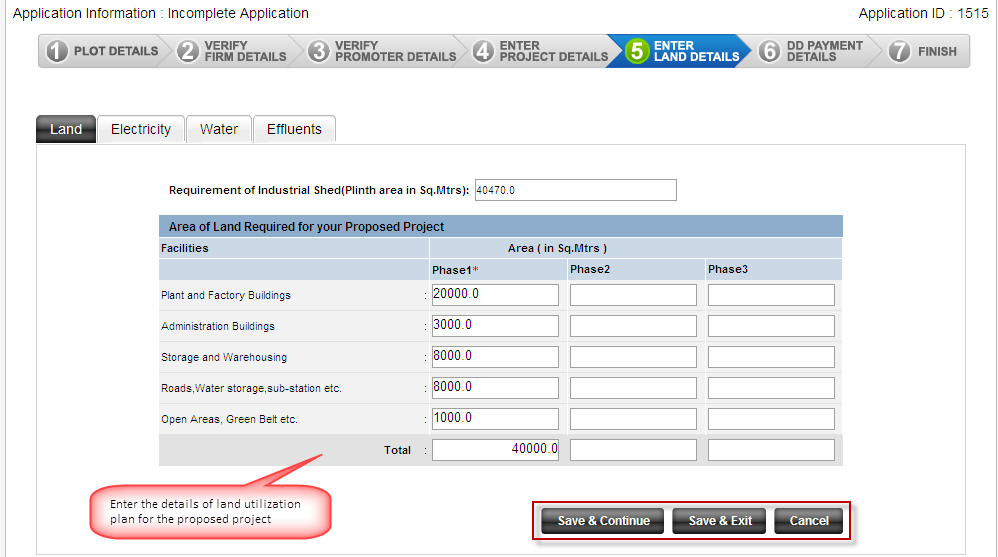
C.5.5 New Application – Enter Land Details – Step 5
- On Clicking the ‘Save & Continue’ button in the plant and machinery screen or on the ‘Enter Land details’ on the top navigation bar, the system will display land details screen
- The Land details are further divided into the following 4 tabs, the same is indicated in the screenshot below:
- Land
- Electricity
- Water
- Effluents
Screen #25: New Application- Enter Land Details- Land
C.5.5.1 Land
- User needs to enter the following details under the ‘Land’ section:
- Enter the total area of land required for the proposed project :
- Plant and Factory Buildings – Enter the area planned to be utilized for plant and factory buildings
- Administration Buildings – Enter the area planned to be utilized for administration buildings
- Storage and Warehousing –Enter the area planned to be utilized for storage and warehousing
- Roads, Water storage, sub-station etc. – Enter the area to be utilized for roads, water storage and substation
- Open Areas, Green Belt etc – Enter the area that will be used as open areas, green belts etc.
- Total- It is the sum of the areas planned to be utilized in the project and is auto- calculated by the system
Note 72: The user can enter the above details of the land for 3 phases with phase 1 details mandatory to enter
- Click on the ‘Save & Continue’ button to proceed to the next tab which is ‘Electricity’
- Click on ‘Save & Exit’ to save the firm details and quit to go back to the ‘My Home ‘ screen
- Click on ‘Cancel’ button to quit the process of updating the Application and go back to the ‘My Home’ screen
Note 73: System will display a confirmation message for quitting the update process on clicking the ‘Cancel’ button
Note 74: User needs to update the Land details tab before moving to the next tab which is ‘Electricity’
C.5.5.2 Electricity
- On clicking the ‘Save & Continue’ button on the land page , the system displays the ‘Electricity’ details screen, as indicated in the screenshot below:
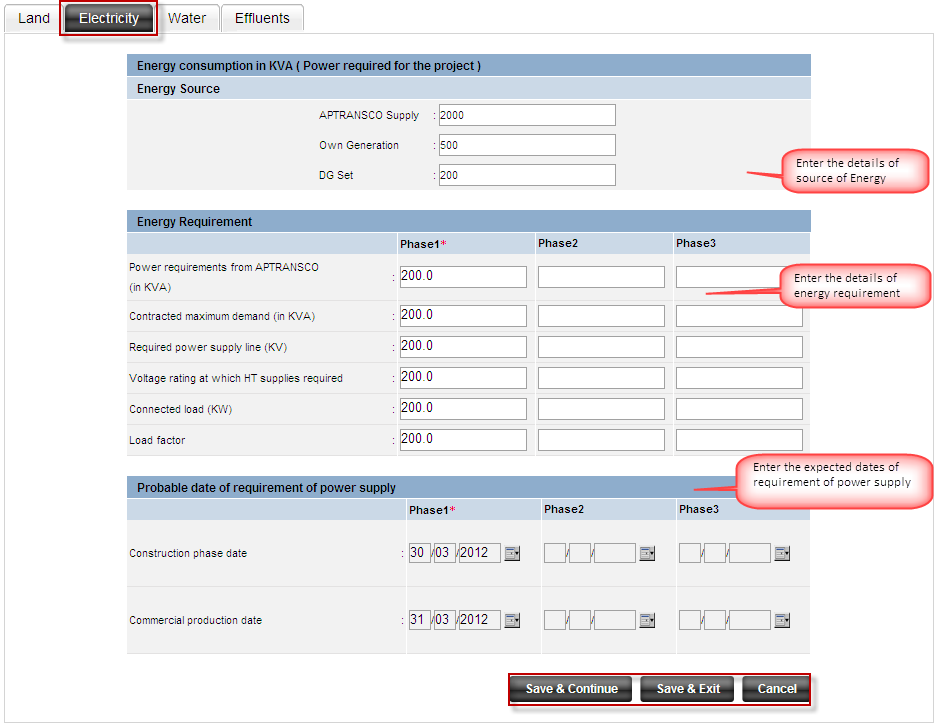
Screen #26: New Application- Enter Land Details- Electricity
- User needs to enter the following details under the ‘Electricity’ tab:
- Energy Source
- APTRANSCO Supply – Enter the energy units planned to be drawn from APTRANSCO
- Own Generation – Enter the energy units planned to be generated for use in the project
- DG Set – Energy units planned to be drawn from diesel generator sets
Note 75: All the above details are optional to enter
- Energy Requirement
- Power requirements from APTRANSCO(in KVA) – Enter the units of power required from APTRANSCO
- Contracted maximum demand (in KVA)- Enter the contracted maximum power requirement
- Required power supply line (KV) – Enter the required power supply line
- Voltage rating at which HT supplies required- Enter the voltage rating at which high tension supply is needed
- Connected load (KW)- Enter the connected load in kilowatts
- Load factor – Enter the value of the load factor of the power source
Note 76: All the above details are optional to enter
- Probable date of requirement of power
supply
- Construction phase date- Enter the planned date of commencement of construction phase of the project
- Commercial production date – Enter the planned date of commencement of commercial production date
Note 77: The user can enter the above details of the land for 3 phases with phase 1 details mandatory to enter
Note 78: Both the construction and commercial production dates cannot be past dates
Note 79: Commercial production date should be greater than commercial production date
- Click on the ‘Save & Continue’ button to proceed to the next tab which is ‘Water’
- Click on ‘Save & Exit’ to save the firm details and quit to go back to the ‘My Home ‘ screen
- Click on ‘Cancel’ button to quit the process of updating the Application and go back to the ‘My Home’ screen
Note 80: System will display a confirmation message for quitting the update process on clicking the ‘Cancel’ button
Note 81: User needs to update the Electricity details tab before moving to the next tab which is ‘Water’
C.5.5.3 Water
- On clicking the ‘Save & Continue’ button on the Electricity page, the system displays the ‘Water’ details screen, as indicated in the screenshot below:
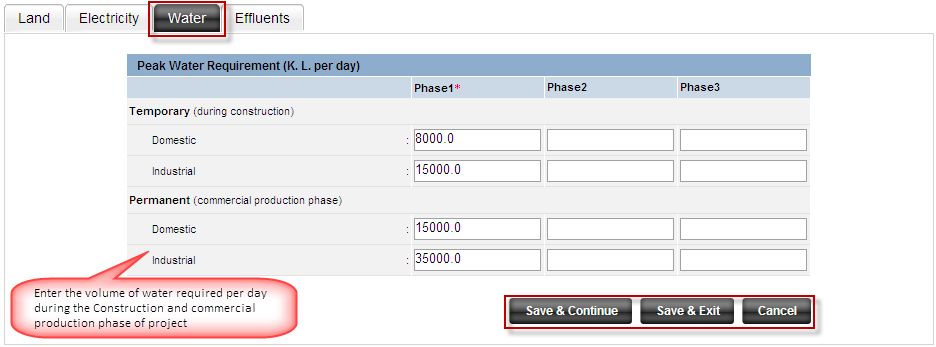
Screen #27: New Application- Enter Land Details- Water
- User needs to enter the following details under the ‘Water’ tab:
- Temporary (during construction)
- Domestic - Enter the highest volume of water required per day during the construction phase of project for domestic purpose
- Industrial - Enter the highest volume of water required per day during the construction phase of project for industrial purpose
- Permanent (commercial production phase)
- Domestic - Enter the highest volume of water required per day during the commercial production phase of project for domestic purpose
- Industrial - Enter the highest volume of water required per day during the commercial production phase of project for industrial purpose
Note 82: The user can enter the above details of the land for 3 phases with phase 1 details mandatory to enter
- Click on the ‘Save & Continue’ button to proceed to the next tab which is ‘Effluents’
- Click on ‘Save & Exit’ to save the firm details and quit to go back to the ‘My Home ‘ screen
- Click on ‘Cancel’ button to quit the process of updating the Application and go back to the ‘My Home’ screen
Note 83: System will display a confirmation message for quitting the update process on clicking the ‘Cancel’ button
Note 84: User needs to update the Water details tab before moving to the next tab which is ‘Effluents’
C.5.5.4 Effluents
- On clicking the ‘Save & Continue’ button on the ‘Water’ page, the system displays the ‘Effluents ‘details screen, as indicated in the screenshot below:
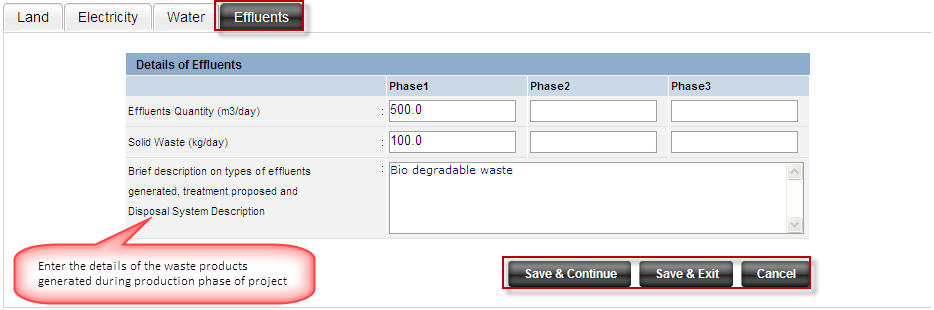
Screen #28: New Application- Enter Land Details- Effluents
- User needs to enter the following details under the ‘Effluents’ tab:
- Effluents Quantity (m3/day) – Enter the volume of liquid waste expected to be generated in the production phase of project
- Solid Waste (kg/day) - Enter the amount solid waste expected to be generated in the production phase of project
- Brief description on types of effluents generated, treatment proposed and Disposal System Description – Provide a brief explanation on the type of effluents and their treatment and disposal plans
Note 85: All the details under this section are optional to enter
- Click on the ‘Save & Continue’ button to proceed to the next step of the online application which is Payment Details
- Click on ‘Save & Exit’ to save the firm details and quit to go back to the ‘My Home ‘ screen
- Click on ‘Cancel’ button to quit the process of updating the Application and go back to the ‘My Home’ screen
Note 86: System will display a confirmation message for quitting the update process on clicking the ‘Cancel’ button
Note 87: User needs to complete the Step-5 before proceeding to the step -6 which is ‘DD Payment Details’
C.5.6 New Application – DD Payment Details – Step 6
- On Clicking the ‘Save & Continue’ button in the Effluent details screen or on the ‘DD Payment Details’ tab on the top navigation bar, the system will display Payment details screen, as indicated in the screenshot below:
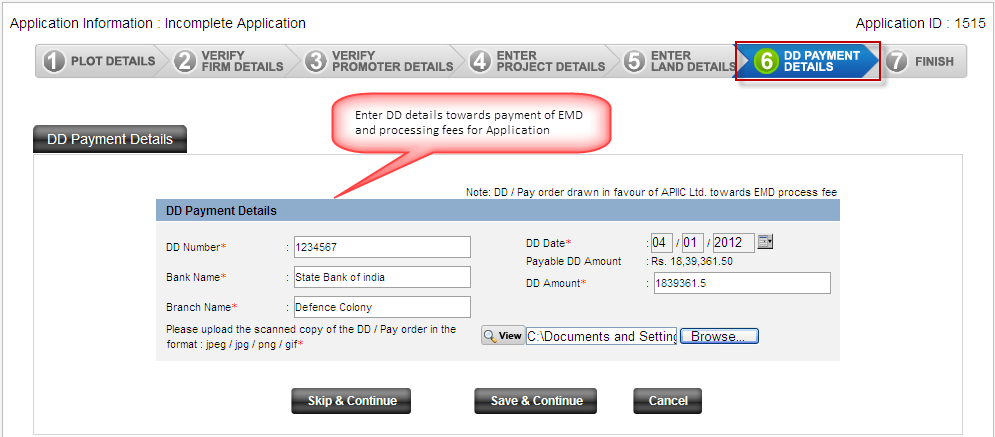
Screen #29: New Application- DD Payment Details
- User needs to enter the following details under the ‘Effluents’ tab:
- DD Number – Enter the Demand Draft number drawn in favor of APIIC towards payment of EMD and Processing fees of Application
- Bank Name – Enter the name of the bank from which the DD is drawn
- Branch Name - Enter the branch name of the bank from which the DD is drawn
- DD Date - Enter the Date on which the DD is drawn towards payment of EMD and Processing fees
- Payable DD Amount – System auto-populates the amount payable to APIIC towards payment of EMD and Processing fees
- DD Amount – Enter to DD Amount
- Upload – Upload the scanned copy of the DD by clicking on the browse button and selecting the file to be uploaded
Note 88: File upload only in the jpeg / jpg / png / gif formats is allowed for scanned copy of DD/PO
Note 89: Once the scanned copy of the DD is uploaded, a ‘View ’ button is displayed to view the same
- Click on ‘Skip & Exit’ to skip updating the payment details and proceed to the next step of online Application which is ‘Finish’
- Click on the ‘Save & Continue’ button to proceed to the next step of the online application which is ‘Finish’
- Click on ‘Cancel’ button to quit the process of updating the Application and go back to the ‘My Home’ screen
Note 90: System will display a confirmation message for quitting the update process on clicking the ‘Cancel’ button
Note 91: User needs to complete the Step-6 before proceeding to the step -7 which is ‘Finish’
C.5.7 New Application – Finish – Step 7
- On Clicking the ‘Save & Continue’ button in the payment details screen or on the ‘Finish tab on the top navigation bar, the system will display upload document screen, as indicated in the screenshot below:
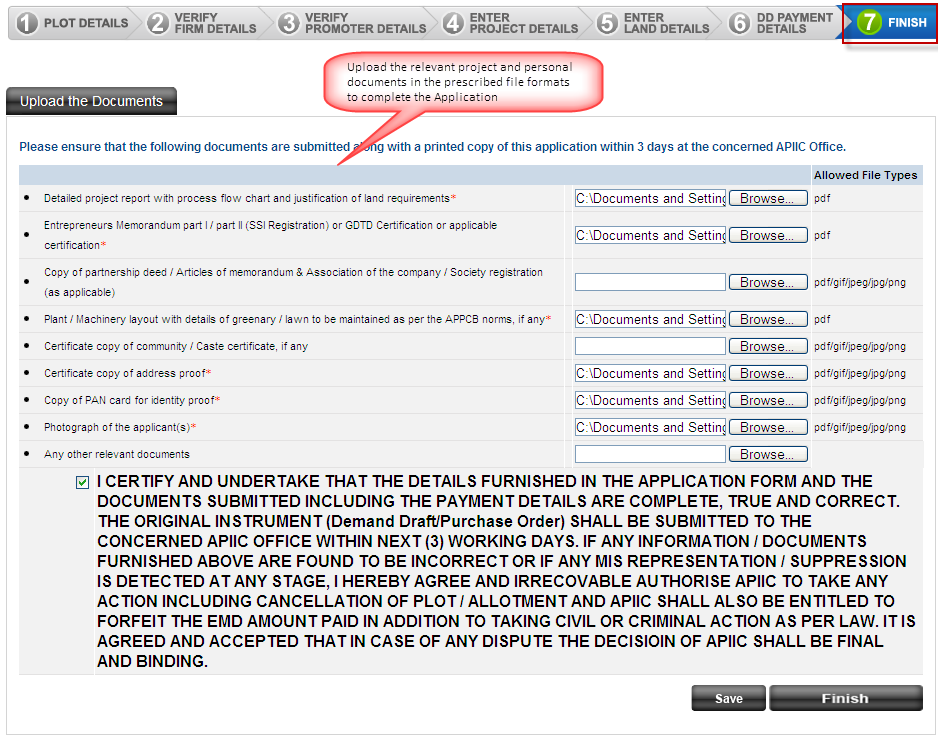
Screen #30: New Application- DD Payment Details
- User needs to upload the following document under this screen:
- Detailed project report with process flow chart and justification of land requirements- Mandatory to upload in the prescribed .PDF file format
- Entrepreneurs Memorandum part I / part II (SSI Registration) or GDTD Certification or applicable certification- Mandatory to upload in the prescribed .PDF file format
- Copy of partnership deed / Articles of memorandum & Association of the company / Society registration (as applicable)- Optional to upload in prescribed pdf /gif / jpeg / jpg / png file formats
Note 92: If the type of organization selected in the ‘Firm registration details’ section is ‘Partnership Firm’ then the above document is mandatory to upload.
- Plant / Machinery layout with details of greenery / lawn to be maintained as per the APPCB norms, if any- Mandatory to upload in the prescribed .PDF file format
- Certificate copy of community / Caste certificate, if any- Optional to upload in prescribed pdf /gif / jpeg / jpg / png file formats
Note 93: If the Applicant is seeking allotment under SC/ST category then community /caste certificate is mandatory to upload
- Certificate copy of address proof- Mandatory to upload in the prescribed pdf /gif / jpeg / jpg / png file formats
- Copy of PAN card for identity proof- Mandatory to upload in the prescribed pdf /gif / jpeg / jpg / png file formats
- Photograph of the applicant(s)- Mandatory to upload in the prescribed pdf /gif / jpeg / jpg / png file formats
- Any other relevant documents- Optional to upload
- User needs to check the checkbox against the self declaration form to validate the same
- Click on ‘Save’ to save the application along with the uploaded documents and go back to the ‘My Home’ screen
Note 94: Once the documents are uploaded and ‘Save’ button is clicked,’ view button is displayed to view the document.
Note 95: User can edit the Application from the ‘My Home’ screen through Edit link
- Click on the ‘Finish’ button to submit the Application to APIIC for consideration in the committee meetings
- On successful submission of the Application an email is triggered to all the board members of the committee of the district under which the Applicant seeks allotment. The email also includes a ‘View’ link to view the Application details
- An SMS alert and email is also triggered to the user on successful submission of the Application
- After submission of the application, user can view the summary of the Applications created by him, in both saved or submitted status in the ‘My Home’ Page , the same is indicated in the screenshot below:

Screen #31: My Home Page – My Applications
- The following details of the Applications are displayed in the ‘My Application’ section of ‘My Home’ screen:
- Application ID – Unique Application identification number generated by the system
- District – The district under which the Application seeks allotment
- Industrial Park – The industrial park under which the Application seeks allotment
- Plot No. selected – The plot (s) for which the Application seeks allotment
- Application creation Date – The date on which the Application was created in the saved or submitted mode
- Application Completion Date – The date on which the Application are submitted to APIIC
- Status – The status of the Application: incomplete (saved) or submitted
- Edit /View - The link are displayed based on the status of the Application
- Edit – Displayed against ‘Incomplete’ Applications , on clicking it opens the Application in editable mode to enable the user to complete the Application
- View – Displayed against the ‘Submitted’ Applications , on clicking it opens the Application in non-editable /read-only mode to enable the user to view the details of the Application
- DD Payment – It indicates the status of the payment details section of the Application if it has been completed or not
- Print - The link is displayed against the submitted application ,on clicking it opens the Application in non-editable /read-only mode with print icon to enable users to print the Application , the same is indicated in the screenshot below:
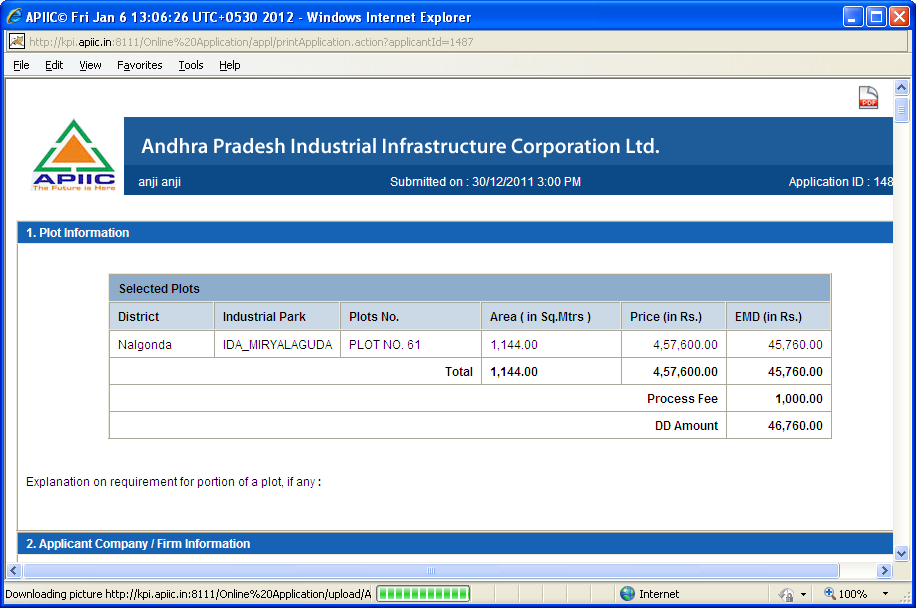
Screen #32: My Home Page – My Applications – Print
C.6 View Submitted Application
- User can view a report on the submitted Applications by clicking on the ‘View Submitted Application’ link on the Home Page, the system display a summary of all the Application that have been submitted by the user, the same is indicated in the screenshot below:
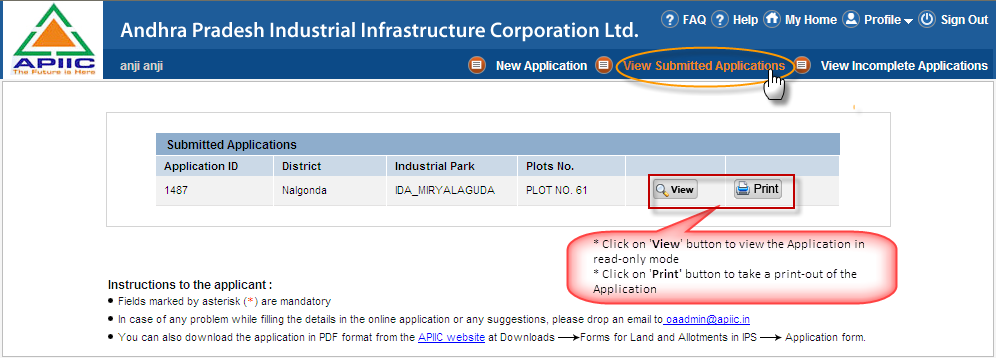
Screen #33: My Home Page – View Submitted Applications
- The following details of the Applications are displayed in the ‘Submitted Application’ section:
- Application ID – Unique Application identification number generated by the system
- District – The district under which the Application seeks allotment
- Industrial Park – The industrial park under which the Application seeks allotment
- Plot No. selected – The plot (s) for which the Application seeks allotment
- View - On clicking it opens the Application in non-editable /read-only mode to enable the user to view the details of the Application
- Print - On clicking it opens the Application in non-editable /read-only mode with print icon to enable users to print the Application
C.7 View Incomplete Applications
- User can view a report on the incomplete and saved Applications by clicking on the ‘View incomplete Application’ link on the Home Page, the system display a summary of all the Application that have been saved by the user and are yet to be completed and submitted to APIIC; the same is indicated in the screenshot below:
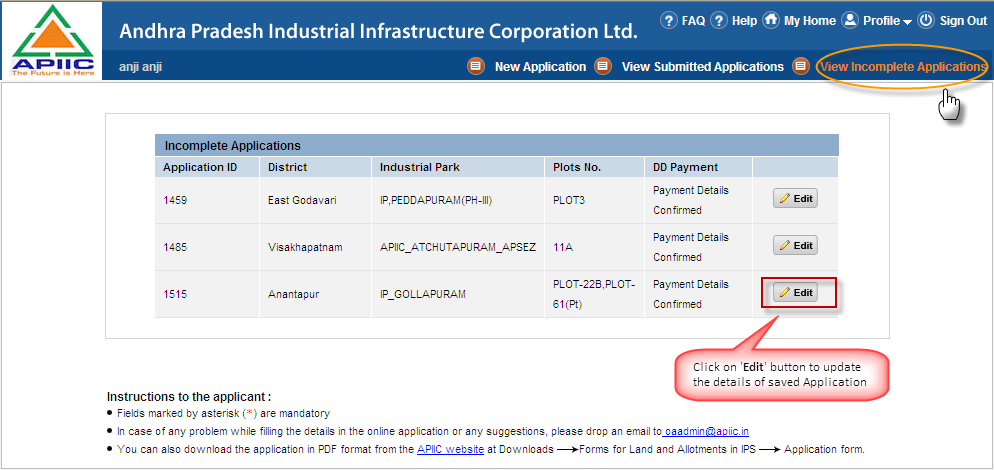
Screen #34: My Home Page – View Incomplete Applications
- The following details of the Applications are displayed in the ‘Submitted Application’ section:
- Application ID – Unique Application identification number generated by the system
- District – The district under which the Application seeks allotment
- Industrial Park – The industrial park under which the Application seeks allotment
- Plot No. selected – The plot (s) for which the Application seeks allotment
- DD Payment – It indicates the status of the payment details section of the Application if it has been completed or not
- Edit - On clicking it opens the Application in editable mode to enable the user to complete the Application
C.8 FAQ
- FAQ section can be referred by the user to seek answers to the frequently asked questions with regards to the submission and processing of the online Application for allotment of plots.
Appendix D: Business Rules
D.1 Business Rules
- Physical copy of the Application in the prescribed format should be submitted in the nearest zonal/sub- zonal office of APIIC, within 2 Days of filing online Application.
- Application is submitted along with refundable Earnest Money Deposit (10% of sales consideration) and non-refundable process fees (0.1 % of the sales consideration)
- Total payable amount towards APIIC for filing an Application for allotment = EMD + Processing Fees
- Applicants belonging to SC or ST category are exempted from the payment of EMD.
- If the Applicant is seeking allotment under SC or ST category then the caste certificate in the prescribed format needs to be submitted along with the Application
- Separate Application for each industrial unit or expansion of industrial unit needs to be submitted.
- Applicant can seek allotment of multiple plots under same Industrial park in a single Application
- If the user enters the firm and promoter detail for an application without updating the same in the ‘My Profile ‘ screen, then the details will be applicable only for the particular application and will not be reflected in the profile
- For proprietary concerns type of organization , the registration details are not mandatory to enter
Appendix E:Glossary and Terms definition
|
Term |
Definition |
|
APIIC |
Andhra Pradesh Industrial infrastructure corporation |
|
IP |
Industrial Park |
|
EMD |
Earnest money deposit |
|
SC |
Schedule caste |
|
ST |
Schedule tribe |
|
SEZ |
Special Economic Zone |
|
CAPTCHA |
Completely Automated Public Turing Test To Tell Computers and Humans Apart |
|
DD |
Demand Draft |
|
Mtr |
Meter (Unit of measurement of distance) |
|
IEM |
Industrial Entrepreneurs Memorandum |
|
LOI |
Letter of Intent |
|
EOU |
Export Oriented Units |
|
NIC(HS) |
National industrial classification (Harmonized commodity description and coding system) |
|
ITC (HS) |
Indian Trade classification (Harmonized commodity description system) |
|
APTRANSCO |
Transmission corporation of Andhra Pradesh |
|
DG set |
Diesel generator set |
|
KVA |
Kilo Volt Ampere – unit of measurement of electrical power |
|
DD |
Demand Draft |